Long story short: Here are practical defensive motorcycle-riding tips for riders in India. These skills will help you stay safe on the road.
Defensive motorcycle riding in India means anticipating hazards before they become emergencies. Instead of assuming that traffic will behave predictably, you manage speed, create space, stay visible and keep an escape route ready.
On Indian roads, a car may change lanes without indicating, an auto-rickshaw may stop suddenly, a pedestrian may emerge from between vehicles, or an animal may enter the road. Defensive riding helps you recognise these risks earlier and respond with control rather than panic.
This practical guide covers defensive riding in city traffic, on highways and rural roads, at night, during monsoon conditions and while carrying a pillion.
Key Takeaways
- Defensive riding in India means: Always expecting the unexpected—from sudden lane changes to stray animals—and choosing to stay alert and put your safety above speed or ego.
- Core defensive riding techniques include: Looking well ahead, leaving plenty of space around you, making yourself visible, staying ready to react, and always riding with proper gear for protection.
- Defensive riding stands out from other styles: It’s about thinking ahead, planning for what could go wrong, and avoiding trouble before it starts—not just reacting or riding slowly.
- Defensive riding helps you avoid common mistakes like: Following too closely, overtaking blindly, missing blind spots, or skipping basic checks on your bike.
- Don’t fall for common myths: Real safety doesn’t come just from riding slowly, having the right of way, or fancy gear. Staying alert, flexible, and ready for surprises is what really keeps you safe.
What Is Defensive Motorcycle Riding?
Defensive riding, also searched as “defensive driving for bikers”, means thinking ahead and staying alert. In this guide we use “defensive riding” because the skills, risks and gear are specific to motorcycles and scooters. Picture yourself riding through city traffic or along a village road. You’re not just watching the road; you’re reading it, looking out for an auto-rickshaw that might swerve, a stray dog about to run out, or a distracted car driver.
You trust your skills, but you don’t push yourself to the limit because you know anything can happen. Real defensive riding means knowing anyone can make a mistake at any time. It’s not about fear, but about staying alert and choosing safety over speed or pride. On the road, staying safe is more important than being right.
What Are The Core Elements Of Defensive Motorcycle Riding?
Defensive riding is more than just following rules. It’s a way of thinking that helps keep you safe, even when Indian roads are unpredictable. Here are five key elements, explained simply for every rider:
1. Scanning And Anticipation
Look well ahead, check mirrors regularly and notice early warning signs such as a drifting car, a pedestrian near the kerb or debris on the road. Early detection gives you more time to slow down, change position or create an escape space. See the scanning section below for a practical routine.
2. Space And Positioning
Maintain a safe following distance and increase it whenever visibility, grip or your view ahead is reduced. Stay where you are clearly visible, not hidden in someone’s blind spot. If a gap is closing, don’t try to squeeze in. Give buses and trucks extra space, stay out of their blind spots, and avoid riding beside them for long periods. See the heavy-vehicle safety section below for practical positioning rules.
3. Visibility And Conspicuity
Make it easier for others to notice you by using your headlight or DRL where fitted, wearing visible or reflective gear, signalling early and choosing a lane position where you are not hidden in a blind spot. Visibility is helpful, but never assume another road user has seen or understood your intention.
4. Control And Readiness
Keep your hands ready by covering your brakes or clutch near possible hazards. Stay in the right gear so you can react quickly, and don’t push yourself to your limits on public roads. Practise emergency swerves and braking in a safe place, so you won’t be caught off guard. See Emergency Riding Skills for how. Slow down before corners and accelerate smoothly as you exit.
5. Preparation And Mindset
Before every ride, complete a quick safety check of the tyres, controls, lights, fluids, chassis and stands. Use the detailed pre-ride checklist below as a routine. Wear all your gear, including your helmet, jacket, gloves, and boots. Most importantly, keep a ‘stay alive first’ attitude. Leave distractions and ego at home, and be ready for surprises on Indian roads.
Before a long ride, also make sure you carry the required bike documents for travel in India.
How Defensive Riding Differs From Other Approaches
Defensive riding is not about being the slowest rider or reacting after danger appears. It focuses on identifying hazards early and preserving time and space to respond safely.
| Approach | Main Focus | Typical Outcome |
|---|---|---|
| Aggressive riding | Making progress through traffic, often with small gaps and frequent overtakes. | Leaves less time and space to respond when another road user changes direction or speed. |
| Reactive riding | Responding only after a hazard becomes obvious. | Can lead to rushed braking, swerving or late decisions. |
| Overly hesitant riding | Avoiding decisions or moving unpredictably to yield space. | May confuse other road users and reduce the rider’s control of lane position. |
| Defensive riding | Scanning ahead, maintaining a buffer, staying visible and planning an escape space. | Gives the rider more time and options when conditions change unexpectedly. |
Defensive Riding Frameworks: Sipde, See And Atgatt
Riding instructors use short memory aids to turn defensive riding into a habit. Three of them come up again and again in rider training: SIPDE, SEE and ATGATT. The first two describe how to think while riding. The third describes how to dress for it. You do not need to memorise all three, but pick one thinking routine and practise it until it becomes automatic.
| Framework | Stands For | What It Helps You Do | Related Tips |
|---|---|---|---|
| SIPDE | Scan, Identify, Predict, Decide, Execute | Break hazard handling into five clear steps, from spotting a risk to acting on it. | Tip 5, 6, 11 and 18 |
| SEE | Search, Evaluate, Execute | A shorter three-step version of the same idea, used in rider training by the Motorcycle Safety Foundation (MSF). | Tip 3, 15 and 18 |
| ATGATT | All The Gear, All The Time | A riding habit: wear protective gear on every ride, however short. | Tip 19 and 20 |
Sipde: Scan, Identify, Predict, Decide, Execute
SIPDE is a five-step loop that you repeat continuously, not a checklist you complete once.
- Scan: Look well ahead, to the sides and in your mirrors, and check the road surface near the motorcycle. See tip 18.
- Identify: Spot anything that could affect your path, such as a bus at a stop, a car with its wheels turned, a stray dog, a pothole or loose gravel.
- Predict: Ask what could go wrong. Might the bus pull out without warning? Might the dog cross? Might the car edge into your lane?
- Decide: Choose your response: slow down, change lane position, create space, cover the brakes, or wait.
- Execute: Carry out the decision smoothly, whether that is signalling, braking progressively, steering or accelerating away from the hazard.
Example on an Indian road: You are riding beside a parked row of cars near a market. Scan: you see a car with a driver inside. Identify: the brake light has come on. Predict: the door may open or the car may pull out. Decide: move slightly away and slow down. Execute: ease off the throttle, cover the brakes and pass with extra space.
See: Search, Evaluate, Execute
SEE is the simplest of the three, and it is easy to run in your head in heavy traffic. The Motorcycle Safety Foundation teaches it in its rider training programmes.
- Search: Look actively for hazards ahead, beside you and behind you, before they become urgent.
- Evaluate: Judge how serious each hazard is and what it might do next. Ask yourself how much time and space you have.
- Execute: Act early by adjusting your speed, your lane position, or both, and communicate with your indicator, brake light or a brief horn or pass light where appropriate.
SEE and SIPDE describe the same habit. SEE combines the first steps of SIPDE into “search” and the last two into “execute”. Use whichever is easier for you to remember.
Atgatt: All The Gear, All The Time
ATGATT is a riding habit rather than a technique. It means wearing a certified helmet, an armoured jacket, gloves, protective trousers and proper boots on every ride, including short trips to the market, and in hot weather. Most crashes happen on ordinary journeys, and you cannot predict which ride will be the one that goes wrong.
ATGATT is not a legal rule, apart from the requirement for a certified helmet, but it is a good standard to aim for. Gear does not prevent a crash, which is why defensive riding comes first. It does reduce injury when something goes wrong. See tip 19 for how to choose a helmet, armour, gloves, boots and rain gear, and tip 20 for the same standards for your pillion.
How To Practise These Frameworks
- Pick one routine. Choose SEE if you want simplicity, or SIPDE if you want more detail.
- Narrate hazards in your head. On your commute, say quietly to yourself, “auto stopping ahead, might pull out, moving right, slowing down.” This makes your scanning more deliberate.
- Practise on familiar roads first. Notice how many possible hazards you spot on your daily route before you use the routine on unfamiliar highways or ghat roads.
- Review after a close call. Ask which step you missed: did you fail to search, judge the hazard wrongly, or react too late?
- Take a formal rider-training course if you can. Practice with a qualified instructor is more effective than reading alone.
Remember that frameworks support judgement rather than replace it. You still need space, speed control and sound decisions on every ride.
Defensive Motorcycle-riding Tips For India
Use these practical defensive-riding techniques according to traffic, visibility, road surface, weather and your motorcycle’s condition. Start with the habits you can practise every day, then build confidence through controlled practice.
Here is a quick reference of all 28 tips. Each one is explained in detail below.
| No. | Tip | Quick Action |
|---|---|---|
| 1 | Maintain proper tyre pressure & tyre health | Check pressure weekly and replace tyres before they reach the minimum tread level. |
| 2 | Check brakes and brake pads | Inspect pads, discs and brake fluid, and service them on schedule. |
| 3 | Practise emergency braking safely | Stay upright, close the throttle, brake progressively and practise in a safe, empty area. |
| 4 | Overtake only when you have a clear, legal and visible gap | Check the road ahead, mirrors and blind spot, signal early and abandon the move if unsure. |
| 5 | Change lanes with a full observation check | Look ahead, check mirrors, signal, do a shoulder check, then move smoothly. |
| 6 | Approach junctions with an escape plan | Slow down early, cover the brakes and never rely only on a green signal. |
| 7 | Do not coast downhill in neutral | Stay in gear and use engine braking with controlled brake application. |
| 8 | Use high beam, low beam and pass light correctly | Use low beam in traffic; high beam only on a dark, clear road. |
| 9 | Ride at night within your visible stopping distance | Slow down, keep extra gap and keep your visor clean. |
| 10 | Check all lights before riding at night | Test the headlight, tail light, brake light and hazard lights. |
| 11 | Set up safely before a corner | Slow down before entry, choose a good lane position and look through the corner. |
| 12 | Watch for parked vehicles and opening doors | Keep lateral distance, cover the brakes and watch for pull-outs and pedestrians. |
| 13 | Filtering through slow traffic: use extreme caution | Filter only when traffic is genuinely slow and the gap is wide; otherwise wait. |
| 14 | Know all traffic signs | Learn mandatory, cautionary and informatory signs and respond correctly. |
| 15 | Keep a safe following distance | Keep at least a two-second gap and increase it in poor conditions. |
| 16 | Stay out of bus and truck blind spots | Avoid riding alongside large vehicles and give them room to turn. |
| 17 | Use your headlight or DRL to improve visibility | Keep lights clean and working, but never assume you have been seen. |
| 18 | Scan the road continuously | Keep your eyes moving between the road ahead, sides, mirrors and escape routes. |
| 19 | Gear up: ISI helmet, armour, gloves and boots | Wear a certified, well-fitted helmet with the strap fastened, plus armoured jacket, gloves, boots and rain gear. |
| 20 | Riding defensively with a pillion | Ride more smoothly, brake earlier, brief the pillion and respect the load limit. |
| 21 | Adjust for conditions | Reduce speed in rain, fog, rough roads and at night. |
| 22 | Ride safely in the monsoon | Slow down, avoid flooded roads and slippery surfaces, dry your brakes and keep your visor clear. |
| 23 | Beware of animals in rural areas | Slow down near animals, especially at dawn and dusk. |
| 24 | Assume you may not be seen | Keep space, avoid blind spots and expect unexpected moves. |
| 25 | Avoid riding when fatigued | Take regular breaks and stop for the day if alertness does not return. |
| 26 | Stay focused: avoid phones, earphones and impaired riding | Set navigation before the ride and never ride impaired. |
| 27 | Practise peripheral vision | Avoid tunnel vision and use side vision to spot hazards early. |
| 28 | What to do after a motorcycle crash or fall | Get away from traffic, check for injuries, inspect the bike and do not ride if in doubt. |
1. Maintain Proper Tyre Pressure & Tyre Health
Even with defensive riding, a worn-out bike tyre may not protect you from unexpected situations. Good grip on sand, gravel, oil, water, or anything else is crucial. Check your tyre air pressure at least once a week.
During regular inspections, look for signs of side wear, significant cuts, punctures, bent spokes, or cracked rims. Certain tyres have indicators for minimum and maximum tread wear. It’s essential to replace them before they reach the minimum tread level.
| Tyre Check | What to Look For | Action |
|---|---|---|
| Air pressure | Pressure below or above the manufacturer’s recommendation, especially before a long ride or with a pillion. | Check weekly when the tyres are cold and adjust as per the owner’s manual. |
| Tread depth | Tread wear indicators reaching the surface, or a smooth, flat-looking centre. | Replace the tyre before it reaches the minimum tread level. |
| Sidewalls | Cuts, cracks, bulges or uneven side wear. | Have a technician inspect it; do not ride on a damaged sidewall. |
| Tread surface | Nails, stones or other embedded objects, and punctures. | Get it repaired or replaced at a proper tyre shop. |
| Wheels and rims | Bent or loose spokes, cracked or dented rims. | Get the wheel checked and trued or replaced before riding. |
2. Check Brakes And Brake Pads
Check your brake pads regularly because you may not notice wear until the pads start damaging the disc plates. Disc plates, or rotors, are more expensive to replace. Don’t let it get to that point.
Inspect discs for deep scoring, cracks, warping or thickness below the manufacturer’s service limit. Have a qualified technician assess any damage. Replace brake fluid at the interval specified in your motorcycle owner’s manual; intervals vary by manufacturer and model.
| Brake Component | Warning Sign | What to Do |
|---|---|---|
| Brake pads | Grinding or squealing noise, very thin friction material, reduced stopping power. | Replace the pads before the metal backing touches the disc. |
| Discs (rotors) | Deep scoring, cracks, warping or thickness below the service limit. | Have a qualified technician assess and replace if needed. |
| Brake fluid | Spongy lever feel, dark fluid or a due service interval. | Replace at the interval in your owner’s manual. |
| Levers and pedal | Excess free play, sticking or uneven response. | Get the brakes serviced before riding. |
3. Practise Emergency Braking Safely
Defensive riding works best when you spot hazards early. But if a car stops suddenly, a pedestrian enters the road, or an animal runs across your path, you may need to stop quickly and under control.
In an emergency, first look ahead in the direction you want the motorcycle to go. Keep the motorcycle as upright as possible, close the throttle, and apply both brakes progressively. Do not grab the front brake suddenly, especially on wet, sandy, oily or uneven roads.
If your motorcycle has ABS, apply firm and steady pressure to the brakes and allow the system to manage wheel lock. ABS can help maintain stability during hard braking, but it cannot create grip on a slippery surface or overcome excessive speed.
If your motorcycle does not have ABS, squeeze the front brake gradually while adding controlled rear-brake pressure. If the front wheel locks, release the lever at once and reapply it progressively. For a rear-wheel skid, see Skid Recovery below, because the correct response depends on whether the bike is still in line.
| Motorcycle Type | How to Brake in an Emergency | Key Caution |
|---|---|---|
| With ABS | Keep the bike upright, close the throttle and apply firm, steady pressure on both brakes. Let ABS manage wheel lock. | ABS cannot create grip on a slippery surface or overcome excessive speed. |
| Without ABS | Squeeze the front brake gradually and add controlled rear-brake pressure. | If the front wheel locks, release the lever and reapply progressively. For a rear-wheel skid, see Skid Recovery below. |
| Wet, sandy or oily road (both types) | Brake earlier and more progressively, with the motorcycle as upright as possible. | Never grab the front brake suddenly. |
Do not try to swerve and brake hard at the same time. First reduce speed while the motorcycle is upright. If an escape route is still available, release braking pressure as needed and steer smoothly toward the safe space.
Practise emergency stops only in a safe, empty area with good road surface and no traffic. Start at low speed, gradually build confidence, and learn how your own motorcycle behaves with a pillion, luggage, wet tyres or different road surfaces.
For a more detailed explanation of braking technique, ABS and front-versus-rear brake use, read our motorcycle braking guide.
Braking is not always enough. When you cannot stop in time, you need to steer around the hazard. Read Emergency Riding Skills for how countersteering works and how to practise a swerve safely.
4. Overtake Only When You Have A Clear, Legal And Visible Gap
Overtaking is one of the highest-risk actions in defensive riding because it temporarily reduces your space and may place you near oncoming traffic, blind spots or changing vehicles. Do not overtake because another rider is impatient or because a small gap appears.
Before overtaking, check the road ahead, your mirrors and blind spot. Confirm that you have enough clear distance to complete the manoeuvre without forcing another road user to brake, swerve or move aside. Signal early, move smoothly, pass without lingering beside the other vehicle, and return only after leaving a safe gap.
Do not overtake near blind curves, hill crests, junctions, pedestrian crossings, school zones, parked-vehicle rows, narrow bridges, railway crossings or any location where your view ahead is limited. If you cannot clearly see that the road is safe, do not begin the manoeuvre.
Passing on the left should never be treated as a routine shortcut. It may be possible in limited situations, such as when a vehicle is turning right or when traffic is moving in separate marked lanes, but local road rules, lane markings and actual safety conditions still apply. Never pass on the left beside a turning vehicle, bus stop, kerb, pedestrian area or shrinking gap.
A pass light, horn or indicator can communicate your presence, but none gives you a right to overtake. Be ready to abandon the manoeuvre if the other vehicle changes speed, position or direction.
For the latest legal requirements, consult the Motor Vehicles Act, Rules and Policies resources on Parivahan and follow applicable road signs, lane markings and local traffic-police directions.
5. Change Lanes With A Full Observation Check
Mirrors do not show every vehicle beside or behind your motorcycle. Before changing lanes, merging, moving around a parked vehicle or beginning an overtake, use a consistent check: look ahead, check mirrors, signal, check your blind spot with a brief shoulder check, then move smoothly only if the space is clear.
Signal early enough to communicate your intention, but do not assume the signal creates space or gives you priority. Keep watching for vehicles that speed up, drift across lanes, filter through traffic or approach from behind.
Make only one lane movement at a time. Avoid sudden swerves, moving across several lanes at once, or changing lanes when you are beside a bus, truck or another vehicle’s blind spot. If the space is uncertain, remain in your lane and try again when you have a clear gap.
After turning or changing lanes, cancel the indicator if it does not cancel automatically. A forgotten indicator can give other road users the wrong message about where you intend to go.
6. Approach Junctions With An Escape Plan
Junctions, side roads, U-turn openings, petrol-station exits and median gaps deserve extra caution. Slow down before entering the conflict area, cover the brakes when appropriate, and look for vehicles that may turn across your path or emerge suddenly.
Do not rely only on a green signal, another driver’s indicator or eye contact. A vehicle may turn without signalling, leave its indicator on by mistake, or move into your path after the driver has looked in another direction.
As you approach a junction, identify a safe escape space. This may be an open area ahead, extra room to one side of your lane, or enough following distance to brake smoothly. Avoid entering a junction while boxed in between vehicles, especially beside buses, trucks or cars that may turn across your path.
Reduce speed when your view is blocked by parked vehicles, buses, roadside stalls, trees, construction barriers or vehicles waiting to turn. If you cannot see clearly into a side road or across an intersection, assume a vehicle, pedestrian, cyclist or animal may enter your path.
At a green signal, scan both sides briefly before proceeding. At an uncontrolled junction, reduce speed early and be prepared to stop, even when you believe you have priority.
7. Do Not Coast Downhill In Neutral
Do not ride in neutral gear when going downhill. If you ride downhill with the clutch pulled in or in neutral, you lose engine braking and must rely much more heavily on the brakes to control speed. Long or repeated braking on a downhill stretch can overheat the brakes and reduce their effectiveness, especially when carrying a pillion or luggage. Stay in an appropriate gear and use engine braking together with controlled brake application. Engine braking uses the engine’s resistance to help control speed and reduces the braking load on long descents.
8. Use High Beam, Low Beam And Pass Light Correctly
Use low beam in city traffic, when following another vehicle and when facing oncoming traffic. Use high beam only on a dark, clear road where it will not dazzle other road users.
| Situation | Recommended Light | Reason |
|---|---|---|
| City traffic | Low beam | Street lighting is usually available and high beam dazzles others. |
| Following another vehicle | Low beam | High beam can glare in the driver’s mirrors. |
| Oncoming traffic | Low beam | Avoids dazzling approaching riders and drivers. |
| Dark, clear road with no traffic | High beam | Lets you see farther, but switch to low beam as soon as a vehicle appears. |
| Alerting another road user | Brief pass light | Signals your presence only. It does not give you right of way or permission to overtake. |
Use the pass light briefly only to alert another road user to your presence. It is not permission to overtake, it does not create right of way, and it does not prove that another driver has seen you. Check the road situation yourself and be ready to abandon the manoeuvre.
9. Ride At Night Within Your Visible Stopping Distance
Night riding demands a larger safety margin because you can only react to hazards after your headlight reveals them. Reduce speed so that you can stop safely within the distance you can clearly see ahead.
Use low beam when following another vehicle or when traffic is approaching from the opposite direction. Use high beam only when the road is clear and it will not dazzle other road users. Continue to assume that another road user may not have seen you, even after you have used your headlight, horn or indicator.
Watch carefully for unlit parked vehicles, pedestrians, cyclists, animals, gravel, potholes, broken road edges and unmarked speed breakers. These hazards can be difficult to identify until you are very close, particularly on village roads and highways.
Keep your visor clean and free from scratches. Avoid dark or heavily tinted visors at night because they further reduce visibility. If rain, fog or glare makes it difficult to see clearly, slow down, increase your following distance and consider stopping at a safe location if conditions become unsafe.
Keep extra following distance at night so you can see around the vehicle ahead and react if it brakes or swerves around a hazard.
10. Check All Lights Before Riding At Night
Always check your tail, brake, hazard, and headlight for problems, since they are important both day and night. Also, watch out for vehicles on the road that don’t have their lights on. These are key defensive and safe riding tips for motorcyclists.
11. Set Up Safely Before A Corner
Slow down before entering a corner, not while leaning heavily through it. Choose an entry speed that allows you to stay within your lane, respond to a pothole or unexpected vehicle, and exit under control.
Choose a lane position that gives you the best view through the bend while keeping a safe buffer from oncoming traffic, road edges and roadside hazards. Do not treat the centre of every lane as automatically safe; watch for gravel, sand, oil, standing water, broken tarmac and patched surfaces.
Look through the corner toward the space where you want the motorcycle to go, rather than staring at a pothole, animal, vehicle or kerb. This helps prevent target fixation and supports smoother steering. See target fixation below for why this happens and how to train against it.
Avoid sudden braking, acceleration or sharp steering while leaned over. If you enter too fast or cannot see around the bend, reduce speed as smoothly as conditions allow and keep the motorcycle within your lane.
12. Watch For Parked Vehicles And Opening Doors
Parked vehicles can hide pedestrians, two-wheelers and vehicles preparing to pull out. A door can also open suddenly into your path, particularly near shops, offices, schools, bus stops and ride-hailing pickup points.
- Keep as much lateral distance as practical from parked vehicles.
- Look for occupants inside, brake lights, reverse lights, turning wheels or a vehicle edging out of a parking space.
- Reduce speed and cover the brakes when passing long rows of parked cars.
- Do not ride between a parked vehicle and fast-moving traffic unless you have enough space to avoid a door opening or a sudden pull-out.
- Watch for pedestrians stepping out from between parked vehicles.
13. Filtering Through Slow Traffic: Use Extreme Caution
In congested traffic, two-wheelers often move through gaps between slower vehicles. However, riders should not treat this as an automatic right or a fixed-speed rule. Road conditions, local enforcement, lane markings, vehicle movement and available space all matter.
Only proceed when traffic is genuinely slow, the gap is wide enough, and you can see potential hazards ahead. Avoid filtering beside buses, trucks or vehicles that may change lanes suddenly. Never force a gap, ride on footpaths, cross solid lane markings where prohibited, or pass through an area where pedestrians may step out.
If there is any doubt, wait behind traffic. Saving a few seconds is never worth losing your escape space.
14. Know All Traffic Signs
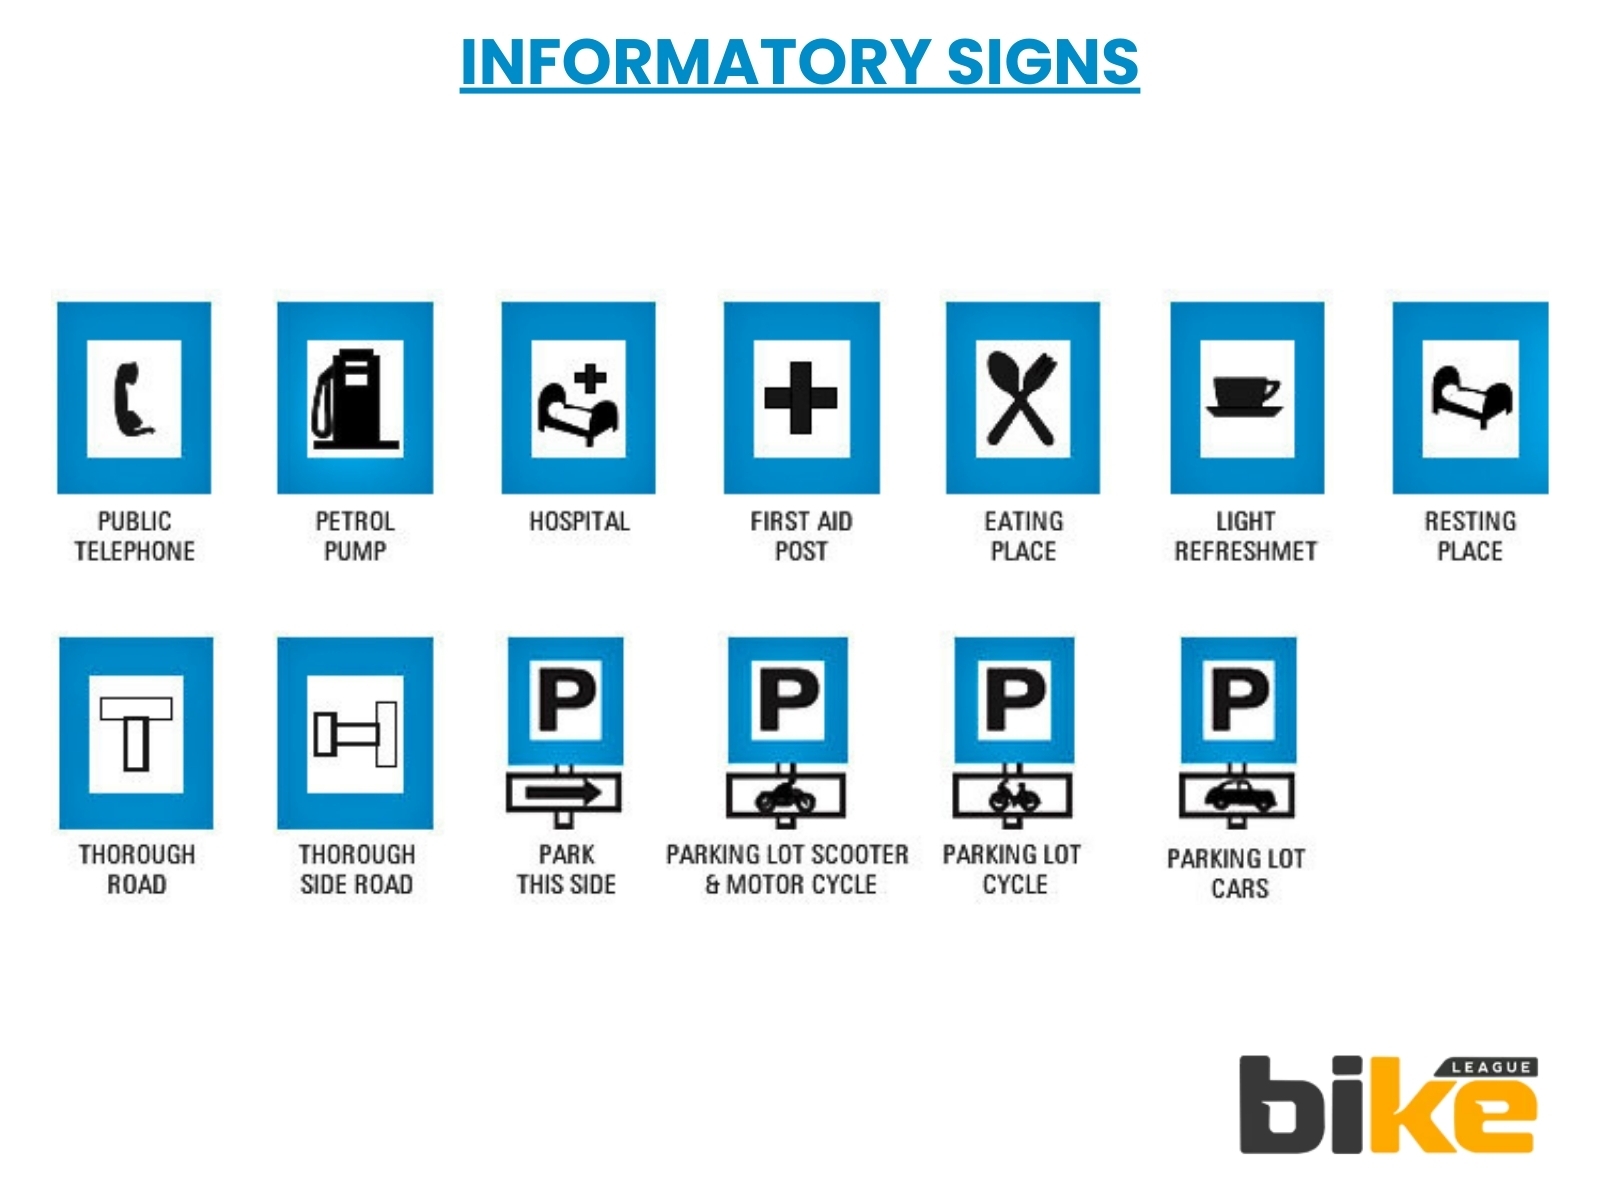
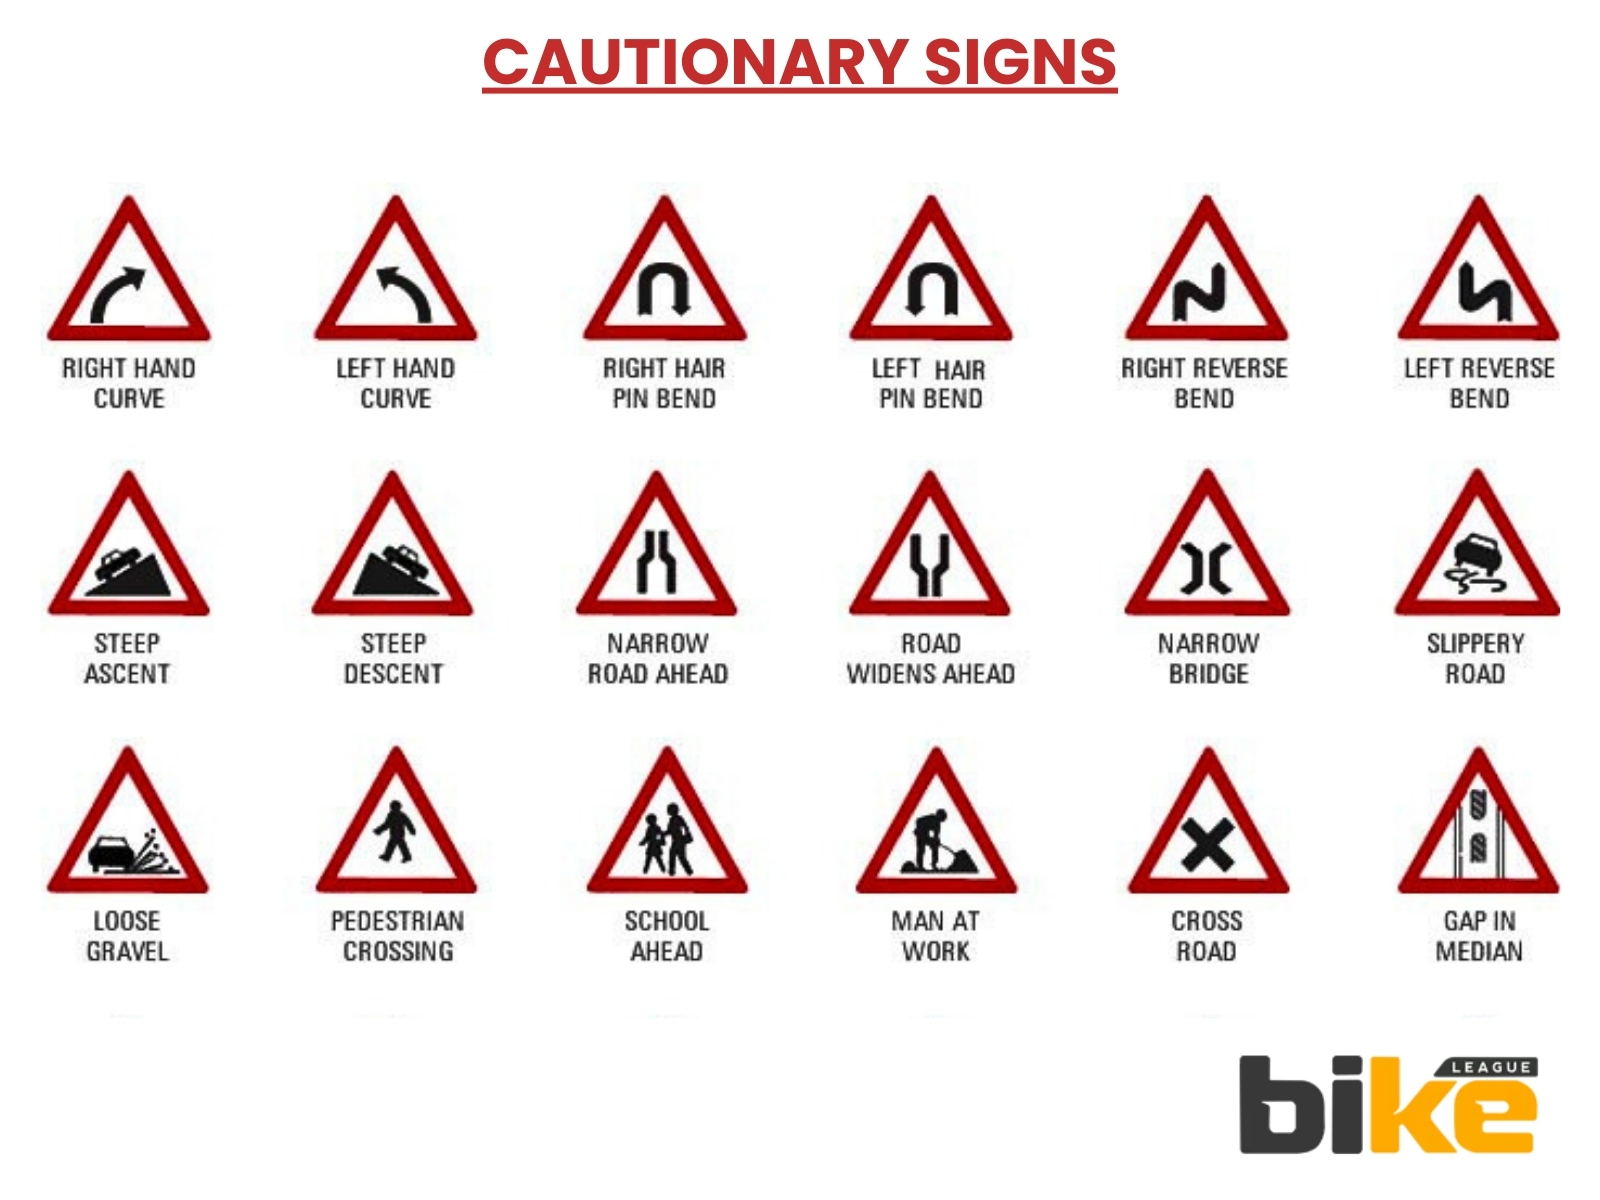
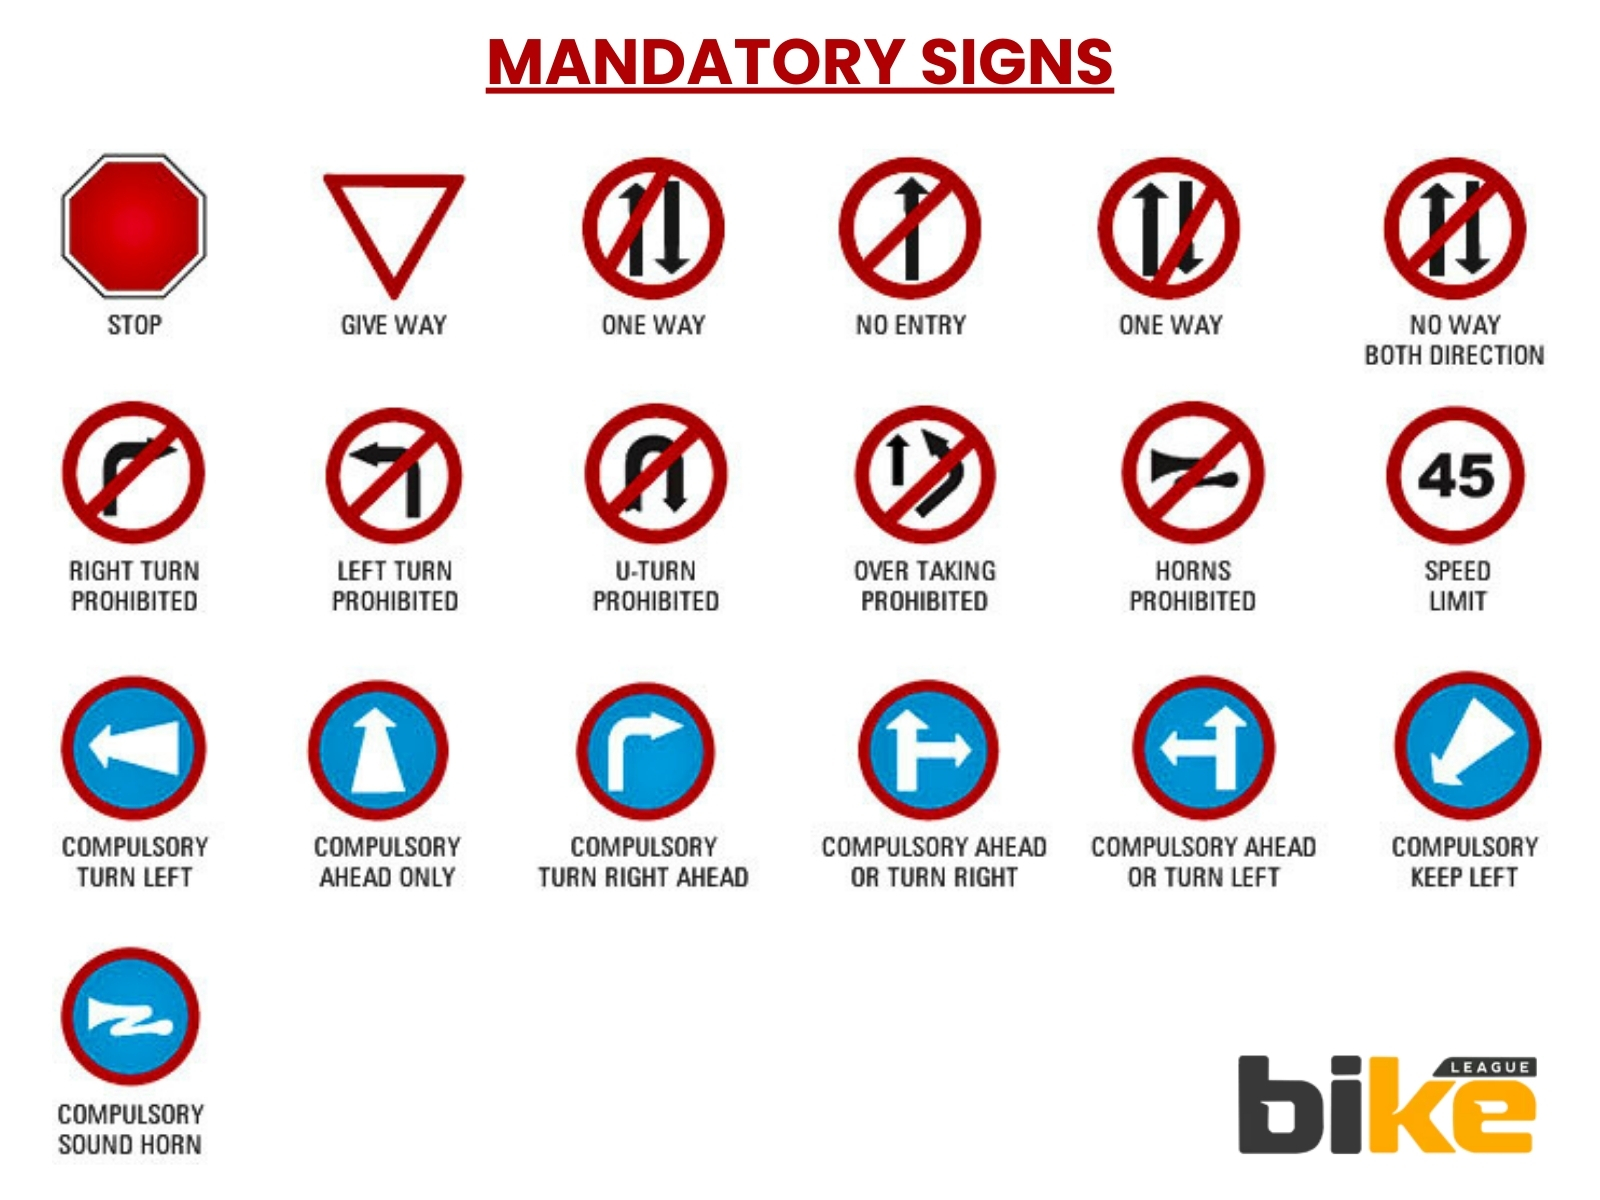
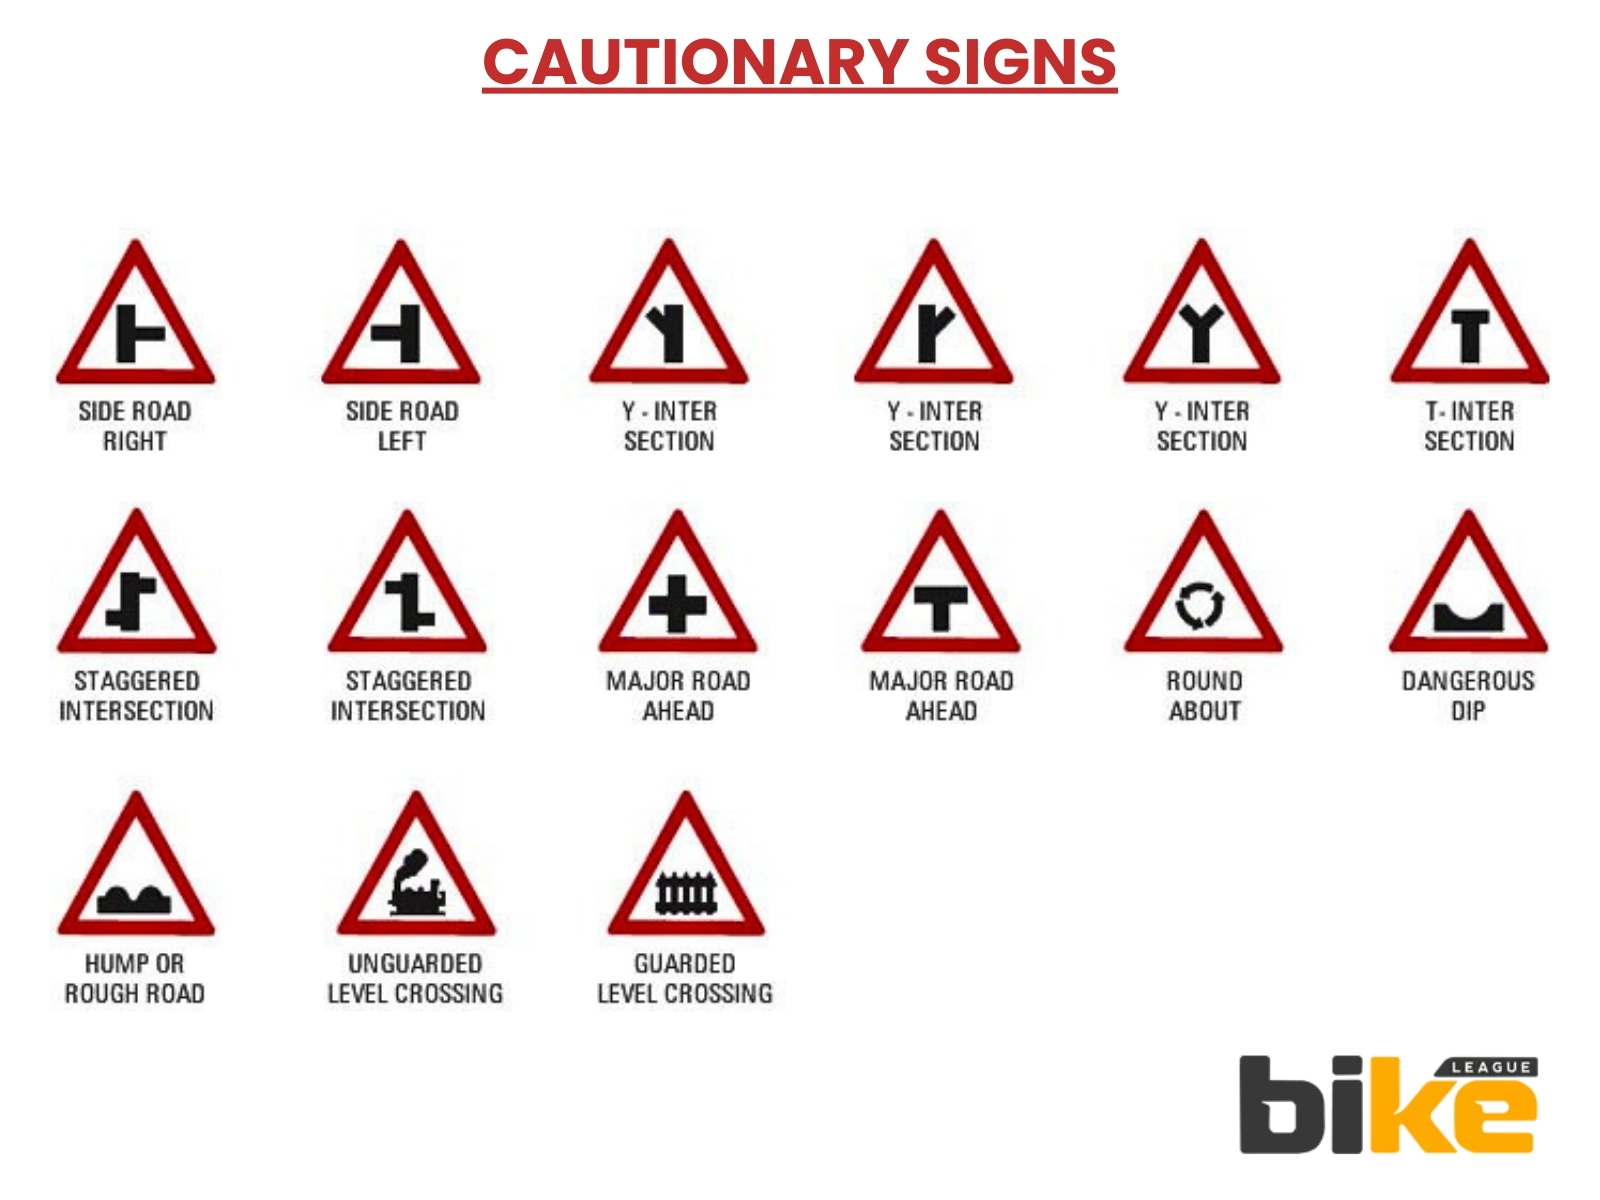
Traffic or road signs are placed along roads to give important information to drivers. These signs use pictures instead of words. Drivers should pay close attention to these signs, respect them, and respond properly, as they help control traffic. There are three main types of traffic signs.
| Sign Type | Purpose | General Appearance | Example |
|---|---|---|---|
| Mandatory (regulatory) signs | Tell you what you must or must not do. | Mostly circular with a red border. | Stop, No Entry, Speed Limit, No Overtaking |
| Cautionary (warning) signs | Warn of a hazard or change in road conditions ahead. | Mostly triangular with a red border. | Sharp Curve, School Ahead, Slippery Road, Pedestrian Crossing |
| Informatory signs | Give directions, locations and facility information. | Mostly rectangular. | Direction boards, Parking, Hospital, Fuel Station |
15. Keep A Safe Following Distance
Leave enough space behind the vehicle ahead to see developing hazards, react smoothly and stop without panic. Use a fixed roadside object—such as a sign, tree or road marking—to judge the gap. After the vehicle ahead passes it, begin counting: “one thousand and one, one thousand and two.” Your motorcycle should not reach that point before the count ends.
Use at least a two-second gap in normal, dry conditions with clear visibility. Increase the gap when it is raining, dark, foggy, dusty or slippery; when carrying a pillion or luggage; when tired; or when following a bus, truck or any vehicle that blocks your view ahead.
| Condition | Following Gap | Why |
|---|---|---|
| Dry road, clear visibility | At least two seconds | Baseline gap for normal riding. |
| Rain or wet road | Increase beyond two seconds | Tyres take longer to stop on wet surfaces. |
| Night, fog or dust | Increase beyond two seconds | You see hazards later and have less time to react. |
| Carrying a pillion or luggage | Increase beyond two seconds | Extra weight lengthens stopping distance. |
| Behind a bus, truck or large SUV | Increase beyond two seconds | They hide potholes, speed breakers and stopped traffic. |
| When tired | Increase beyond two seconds | Fatigue slows reaction time. |
Do not follow closely simply to prevent another vehicle from entering the gap. A safe buffer is not wasted space—it is your time to brake, change position or avoid a hazard. If another vehicle moves into the space, reduce speed gradually and rebuild the gap.
Position your motorcycle so you can see beyond the vehicle ahead where possible. Avoid sitting directly behind a bus, truck or large SUV for long periods because it can hide potholes, speed breakers, stopped traffic and pedestrians.
16. Stay Out Of Bus And Truck Blind Spots
Buses, trucks and other large vehicles need more room to turn, take longer to stop, and have larger blind spots than cars. Do not assume that the driver has seen your motorcycle just because you can see the vehicle’s mirrors.
| Position Near a Large Vehicle | Risk | Safer Action |
|---|---|---|
| Beside the front doors or rear wheels | Driver may not see you; sudden lane or stop movements close the gap. | Avoid staying alongside. Drop back or pass decisively only when it is safe and legal. |
| Directly behind, very close | You cannot see hazards ahead and have little time to brake. | Increase the gap and position yourself to see around the vehicle. |
| Between the vehicle and a kerb, divider or parked vehicle | The space can close when the vehicle pulls toward a bus stop or swings wide. | Never squeeze into the gap. |
| Inside a left-turning vehicle at a junction | You can be caught by the turn. | Stay back, watch its indicators and wheel direction, and wait if unsure. |
Avoid riding alongside a bus or truck for long periods, especially beside its front doors, rear wheels or rear corners. Either stay well behind with a clear view ahead or overtake decisively only when the road is fully visible and it is safe and legal to do so.
Never squeeze between a large vehicle and a kerb, divider, parked vehicle or another lane of traffic. A bus may pull toward a bus stop, while a truck may move wide before turning. Both movements can close your escape space in seconds.
At junctions, do not position your motorcycle on the inside of a large vehicle that may turn left. Give it room, watch its indicators and wheel direction, and wait if you are unsure of its next movement.
Keep a larger following distance behind heavy vehicles. Their size can block your view of potholes, speed breakers, pedestrians, stalled vehicles and traffic queues ahead. Move to a position where you can see around the vehicle without entering its blind spot.
In rain, at night or on uneven roads, increase the gap further. Spray, poor visibility, sudden braking and loose material near heavy vehicles can reduce the time available to react.
17. Use Your Headlight Or Drl To Improve Visibility
Use your motorcycle’s headlight or daytime running light as designed by the manufacturer, and make sure the lens, tail light, brake light and indicators are clean and working. A visible motorcycle is easier for other road users to notice, especially in rain, shade, dawn, dusk and heavy traffic.
However, a headlight or DRL does not guarantee that another driver has seen you. Continue to use safe lane position, speed control, scanning and escape space.
18. Scan The Road Continuously
Do not fix your eyes only on the vehicle directly ahead. Keep your vision moving between the road ahead, the space beside your motorcycle, mirrors, junctions, parked vehicles and possible escape routes.
Look well ahead to identify developing hazards early, then bring your focus back to the road surface near the motorcycle for potholes, gravel, oil, broken edges and speed breakers. This broad visual scan helps you recognise risk before it becomes an emergency.
Check mirrors before slowing, changing position, turning, overtaking or moving around an obstacle. Before changing lanes or merging, use mirrors, signal clearly and perform a shoulder check to confirm that the blind spot is clear.
At junctions, bus stops, parked-vehicle rows and market areas, scan more frequently because pedestrians, autos, delivery riders and cars may enter your path with little warning.
19. Gear Up: Isi Helmet, Armour, Gloves And Boots
Defensive riding reduces your chances of a crash, but protective gear decides how much a crash costs you. Your helmet matters most, and the rest of your gear protects the parts of your body that meet the road first: hands, knees, elbows, shoulders and ankles.
Helmet: Choose A Certified One
In India, a helmet for road use must carry the ISI mark under IS 4151:2015, issued by the Bureau of Indian Standards (BIS). Helmets without this certification do not meet the legal requirement, however good they may look. Under Section 129 of the Motor Vehicles Act, the requirement applies to the rider and the pillion, and the helmet must be worn with the strap fastened.
- Look for the ISI mark and licence number on the helmet and check them against the BIS records (for example, through the BIS Care app or the BIS website) if you are unsure whether a helmet is genuine.
- Avoid uncertified helmets, construction-style hard hats, half-caps and roadside helmets with no certification.
- Full-face helmets give the most coverage because they also protect the chin and jaw. Open-face and flip-up helmets can be legal if ISI-certified, but they offer less protection to the face.
- Check the inner label and the manufacturing date. A clean, intact shell, a firm liner and a sound retention system matter more than a low price or a fashionable graphic.
Fit And Strap Check
A helmet only protects you if it stays on your head and sits correctly. Test the fit every time you buy a new helmet and re-check the strap before every ride.
| Check | What Good Looks Like | Warning Sign |
|---|---|---|
| Snug fit | The helmet feels firm around the head and cheeks, with no pressure points. | It shifts easily, or causes headaches or sharp pressure spots. |
| Position | The front sits low on your forehead, just above the eyebrows, not tilted back. | A visible gap at the front, or the helmet sits high or tilted. |
| Rotation test | With the strap fastened, the helmet does not roll forward or backwards when you try to move it by hand. | The helmet moves independently of your skin, or rotates on your head. |
| Chin strap | Fastened snugly under the chin, tight enough that only a finger or two fits between the strap and your chin. | A loose strap, an unlatched buckle, or a damaged or frayed strap. |
| Buckle and stitching | The buckle clicks securely and the stitching is intact. | A buckle that pops open easily, or worn or cut webbing. |
| Glasses, if you wear them | Your glasses fit comfortably inside the helmet without pressing on the temples. | Pressure from the frames, or a gap that lets wind in. |
Never ride with an unfastened strap. A helmet that comes off during a crash offers little or no protection, and it is also a legal violation.
When To Replace Your Helmet
- After any significant impact, even if there are no visible cracks. The protective liner inside can be compressed and damaged in ways you cannot see.
- After a drop onto a hard surface, if you see cracks, dents, a loose liner or any damage to the shell or strap.
- When it is old. Many manufacturers suggest replacing a helmet after about five years from its manufacture date, or earlier if it shows wear. Check the guidance in your helmet manual, because materials, use and storage all affect the lifespan.
- When the padding is worn or the fit changes. A flattened, loose interior no longer holds the helmet securely.
- When the strap, buckle or visor mechanism is damaged and cannot be repaired by the manufacturer.
- Avoid second-hand helmets, as you cannot know whether they have been in a crash.
Look after your helmet. Clean it with mild soap and water, avoid strong solvents, paints or adhesives unless the manufacturer says they are safe, and do not hang it on the mirror or store it in a hot car for long periods.
Choosing A Visor
- Use a clear visor for night, dusk, rain and tunnels. Dark or heavily tinted visors reduce what you can see when light is low.
- For bright daytime riding, a lightly tinted visor, a drop-down inner sun visor or good sunglasses can reduce glare, but switch to clear when the light fades.
- Replace scratched, cracked or cloudy visors. Scratches scatter headlight glare at night and make it harder to see.
- Keep it clean and check that it closes securely and does not rattle or lift at speed.
- Treat anti-fog inserts and coatings as helpful additions, not a reason to ride when you cannot see clearly. See tip 22 for visor care in the rain.
Armoured Jacket, Gloves, Boots And Pants
Helmets protect your head, but a fall at even modest speed can cause serious injury to hands, knees, elbows and ankles. Suitable riding gear reduces abrasion and impact injuries and improves your comfort on long rides.
| Gear | What to Look For | Why It Matters |
|---|---|---|
| Riding jacket | Abrasion-resistant fabric or leather, with removable armour at the shoulders, elbows and back. Mesh jackets with armour suit hot weather; choose one with a waterproof liner for the monsoon. | Protects against road rash and impacts on the joints most exposed in a fall. |
| Gloves | Full-fingered, snug and comfortable, with reinforced palms and protection on the knuckles. Gauntlet-style cuffs that overlap the jacket sleeves help keep them in place. | Hands are the first thing to hit the ground in a fall, and gloves also help with grip and weather protection. |
| Boots | Sturdy, over-the-ankle footwear with a non-slip sole and protection around the ankle. Avoid sandals and slippers. | Protect against ankle injuries, hot exhaust parts and slipping at stops. |
| Riding pants or protective trousers | Abrasion-resistant material with knee armour, or reinforced riding jeans. | Ordinary jeans and shorts offer little protection when sliding on tarmac. |
| Rain gear | A fitted two-piece rain suit in a bright colour with reflective panels; waterproof gloves and boots or shoe covers. | Keeps you dry, visible and in control of the levers. See tip 22. |
| Reflective and high-visibility items | Reflective strips or a bright jacket, especially for dawn, dusk and night riding. | Helps other road users notice you sooner. |
- Check the armour. Look for armour that stays in place, is comfortable, and is rated to a recognised standard (such as CE) where the manufacturer states it.
- Fit matters. Loose gear can shift in a fall and leave the armour in the wrong position. It should be snug without restricting movement.
- Buy for your climate. Ventilated mesh gear, a hydration plan and light colours help in Indian summers, so you are less tempted to skip your gear in the heat.
- Replace damaged gear. Torn stitching, hardened armour and worn-through palms reduce the protection you paid for.
Pillion Helmet And Gear Rules
The helmet requirement applies to the pillion as well as the rider. Under Section 129 of the Motor Vehicles Act, any person riding as a pillion must wear protective headgear that meets the BIS standard, with the strap fastened. It is not enough for the rider alone to be protected.
- The pillion needs their own ISI-certified helmet, properly fitted to their head size. Do not lend a large helmet to a smaller person, or a small helmet to a larger one.
- Check the pillion’s strap before you set off, as you would check your own.
- Ask the pillion to wear suitable footwear, gloves and a jacket, and to avoid loose scarves, dupattas or clothes that can catch in the wheel or chain.
- New two-wheelers are meant to be sold with two BIS-certified helmets, one for the rider and one for the pillion. The requirement was proposed by MoRTH in 2025, and it is widely reported to apply from 1 January 2026. Ask your dealer what they provide, and confirm that both helmets carry the ISI mark.
- Children up to four years old have additional rules. A crash helmet and a safety harness are mandatory, and the motorcycle must not exceed 40 km/h. See Carrying a Child as a Pillion under tip 20.
For the latest legal requirements and penalties, see the Motor Vehicles Act, Rules and Policies resources on Parivahan. For more on riding with a passenger, see tip 20.
Quick Gear Checklist Before You Ride
- ISI-marked helmet, fitted correctly, strap fastened
- Clear, clean, undamaged visor
- Armoured jacket and protective pants
- Gloves and over-the-ankle boots
- Reflective or bright clothing for low light
- Rain gear if there is any chance of showers
- Helmet and gear for the pillion
20. Riding Defensively With A Pillion
A pillion changes how your motorcycle accelerates, turns and stops. The extra weight can increase stopping distance, reduce ground clearance on some motorcycles, and make sudden steering or braking less stable.
| Area | Effect of a Pillion | What the Rider Should Do |
|---|---|---|
| Braking | Longer stopping distance. | Brake earlier and more smoothly; increase following distance. |
| Acceleration | Slower response and less stability. | Accelerate gradually. |
| Cornering | Less stable and reduced ground clearance on some motorcycles. | Slow down before the corner and avoid sudden steering. |
| Speed breakers and potholes | Greater impact on suspension and balance. | Reduce speed early. |
| Pillion behaviour | Sudden movements or leaning can upset balance. | Brief the pillion: helmet on, feet on footrests, hold securely, no sudden movements. |
Before moving, make sure the pillion is wearing a properly fitted helmet and suitable footwear. Ask them to sit facing forward, keep both feet on the footrests, hold the grab rail or rider securely, and avoid sudden movements.
Ride more smoothly than usual. Accelerate gradually, brake earlier and use a larger following distance. Slow down before corners, speed breakers, potholes and rough roads.
Tell the pillion not to lean unexpectedly, use a phone in a distracting way, or dismount until the motorcycle has fully stopped and you have given a clear signal. Extra care is especially important in rain, at night, on steep roads and when carrying luggage.
Check your motorcycle owner’s manual for its maximum load limit. Do not overload the motorcycle with a pillion, luggage and accessories, as this can affect handling, tyre performance and braking.
Carrying A Child As A Pillion: Rules In India
India has specific legal requirements for young children on motorcycles. The Ministry of Road Transport and Highways (MoRTH) notified them on 15 February 2022 by amending Rule 138 of the Central Motor Vehicles Rules, 1989 (Central Motor Vehicles (Second Amendment) Rules, 2022), under Section 129 of the Motor Vehicles Act. The rules came into force one year after publication.
| Requirement | What the Rule Says | What It Means in Practice |
|---|---|---|
| Safety harness | Mandatory for a child up to four years old. The harness attaches the child to the rider. | The harness is an adjustable vest worn by the child, with straps that form shoulder loops worn by the rider. It secures the child’s upper body to yours. A hand or an arm around the child is not a substitute. |
| Crash helmet | Mandatory for the child. Reports of the rule describe the helmet requirement as covering children from about 9 months to 4 years. | The helmet must fit the child’s head. An adult or oversized helmet can shift or come off. |
| Speed limit | The motorcycle must not exceed 40 km/h while carrying a child up to four years old. | The 40 km/h cap applies even where the posted limit is higher. That includes highways, so plan the trip accordingly, or choose another mode of transport. |
Child helmets and harnesses have been hard to find. In November 2025, the Karnataka High Court directed authorities to take steps within six months to make them available, after a petition noted that the requirement had not been effectively implemented. Ask a dealer or a reputable riding-gear retailer, check the fit in person, and do not substitute an adult helmet or a homemade strap.
The legal minimum is not the same as safe. The International Road Federation has pointed out that a small child whose feet do not reach the footrests can still be badly hurt at U-turns, junctions or in a fall, even when wearing a harness. Our practical advice, which goes beyond what the rule requires:
- Only carry a child who can sit upright, stay awake and hold on. A sleepy or slumping child can pull the harness and upset your balance.
- Check the harness and helmet before every ride. Look at the buckles, stitching and adjusters, and make sure the harness is snug on the child and the straps are securely fitted to you.
- Do not carry infants too young to be fitted with a helmet. If a properly fitting helmet is not available, it is safer not to take the child on a motorcycle at all.
- Seat the child directly behind you, facing forward, and never between you and the handlebars or on the fuel tank.
- Choose another mode of transport for long trips, highway stretches, ghat roads, rain and night riding. A 40 km/h limit on a highway also leaves you much slower than surrounding traffic.
- Ride even more smoothly than with an adult pillion: brake earlier, take corners slower, avoid speed breakers at speed, and leave a larger following distance.
- Children over four years are not covered by the harness rule, but they still need a properly fitted, certified helmet with the strap fastened (see tip 19), suitable footwear, and feet on the footrests.
Rules can be amended and states may add their own enforcement. Before you ride, check the latest notification on the Parivahan Motor Vehicles Act, Rules and Policies page.
21. Adjust For Conditions
Consider how weather, road conditions, and traffic affect your speed. Slow down when it’s raining, foggy, the road is rough, or at night.
| Condition | Main Hazard | Adjustment |
|---|---|---|
| Rain | Reduced grip and visibility; aquaplaning. | Reduce speed, avoid sudden inputs, increase following distance. |
| Fog | Very limited visibility. | Slow down, use low beam and consider stopping at a safe location. |
| Rough or gravel road | Loose surface can upset the tyres. | Reduce speed and avoid hard braking or leaning. |
| Night | You see hazards only when the headlight reveals them. | Ride within your visible stopping distance. |
22. Ride Safely In The Monsoon: Aquaplaning, Flooded Roads And Slippery Surfaces
The monsoon changes almost everything about how a motorcycle grips, stops and is seen. Tyres have less traction, brakes respond more slowly, your visor fogs, and hazards such as potholes and open manholes disappear under water. Ride at a lower speed than you would in the dry, and give every input (throttle, brake, steering) more time and smoothness.
Avoid Aquaplaning (hydroplaning)
Aquaplaning happens when water builds up between the tyre and the road, so the tyre rides on a film of water and loses grip. You may feel the steering go light or the bike feel loose. Higher speed, worn tread and low tyre pressure all make it more likely.
- Check tread depth and tyre pressure before the season starts. Worn tyres clear water poorly.
- Reduce speed well before standing water, especially in low-lying areas, near drains and on flyover dips.
- If you feel the bike float, do not brake hard or steer sharply. Ease off the throttle smoothly, keep the handlebars straight and let the tyres reconnect with the road.
- Avoid sudden braking, acceleration or sharp turns on wet roads, and keep lean angles small.
- If heavy rain is forecast, consider delaying the ride or choosing a route with less chance of waterlogging.
Flooded Roads: How To Judge Water Depth
Never assume a waterlogged road is only as deep as it looks. Muddy water hides potholes, open manholes, broken edges, debris and sometimes live electrical hazards.
| Situation | What to Do |
|---|---|
| You cannot see the road surface or lane markings under the water | Do not enter. Turn back or find another route. |
| Water looks like it would reach the exhaust outlet, air intake or engine | Do not enter. Water can stall the engine and cause serious engine damage. |
| Cars, autos or other two-wheelers have stalled ahead | Treat it as a warning. Stop and wait or turn back. |
| Water is moving or flowing across the road | Do not cross. Flowing water can push a motorcycle sideways and can be deeper than it looks. |
| Shallow, still water where you can clearly see the road | Slow down, stay in a low gear, keep steady throttle and avoid stopping mid-way. |
- Watch a larger vehicle cross first, from a safe distance. This gives a rough idea of depth, but do not follow closely. A bus or truck creates a wave that can push water into your exhaust or knock you off balance.
- Cross slowly and steadily. Use a low gear, keep the revs up slightly and hold a steady throttle. Avoid sudden throttle changes, which can stall the engine or upset the bike.
- Keep your legs and eyes ready. Look ahead for the shallowest, clearest line and be ready to put a foot down if the bike wobbles.
- If the engine stalls in water, do not keep cranking it. Water entering the engine can cause severe damage. Push the motorcycle out to dry ground and have it checked, especially if it will not start or sounds unusual.
- Electric two-wheelers: follow the manufacturer’s guidance on water resistance and maximum wading depth in the owner’s manual, and avoid deep water regardless of an IP rating.
After crossing water, ride slowly for a short distance and dry your brakes (see below). Get the bike checked if you notice unusual noises, loss of power, electrical faults or spongy brakes.
Slippery Surfaces To Watch For
Even on a road that looks fine, certain surfaces become very slippery when wet. Slow down before them rather than braking or turning on them.
| Surface | Why It Is Risky in the Rain | Safer Approach |
|---|---|---|
| Painted road markings, zebra crossings and painted speed breakers | Paint offers much less grip than tarmac when wet. | Cross them upright and straight, with no braking, sharp steering or acceleration on the paint. |
| Manhole covers, metal plates and expansion joints | Smooth metal is very slippery when wet. | Avoid where possible; otherwise cross upright and steady. |
| Oil and diesel patches | Often show as a rainbow sheen, especially at junctions, bus stops and fuel-station exits. | Slow down early and avoid braking or leaning over them. |
| Wet leaves, mud and silt | They create a slippery layer, often near road edges and under trees. | Keep to the cleaner part of the lane and reduce speed. |
| Tiled or polished surfaces, ramps and parking entrances | Very low grip when wet. | Enter and exit slowly, with minimal braking and steering. |
| Potholes and broken edges hidden by water | You cannot judge their depth or position. | Slow down, increase your following distance and avoid puddles you cannot see through. |
The First Rain After A Dry Spell
After a long dry period, oil, rubber dust and grime build up on the road surface. The first showers can mix with this residue and make the road unusually slippery, even in light rain. Treat the first rain of the season with extra caution: reduce speed, increase your following distance and brake earlier and more gently than you would on a wet road later in the season. Tyre-track areas left by other vehicles are often cleaner than the centre of the lane, but always watch the actual road surface rather than relying on a rule.
Dry Your Brakes And Brake Earlier
Wet brakes can feel weaker for a short distance. Water on the discs or drums reduces braking power until it clears.
- Brake earlier and more progressively than in the dry, using both brakes.
- After riding through deep water or heavy rain, and once traffic behind you allows, apply the brakes lightly a few times while riding slowly. This helps clear water from the discs and pads.
- Keep extra distance from the vehicle ahead. A two-second gap in the dry is not enough on a wet road, so increase it noticeably.
- Have worn pads, low brake fluid or spongy levers repaired before the monsoon begins.
Keep Your Visor Clear And Fog-free
A fogged or streaked visor is a serious visibility risk, especially at night or behind large vehicles that throw up spray.
- Use an anti-fog insert or anti-fog treatment if your helmet supports it.
- Open the visor slightly at low speed or when stopped to let air circulate, but only when it is safe to do so.
- Avoid breathing upward into the visor and keep the helmet vents clean and working.
- Clean the visor with a soft, clean cloth and water. Wiping with a dry, gritty glove can scratch it, and scratches scatter light at night.
- Avoid tinted or dark visors in rain and after dark.
- If you cannot see clearly, slow down and stop in a safe place rather than riding blind.
Choose Rain Gear That Improves Safety
- Prefer a fitted two-piece rain suit in a bright colour with reflective panels. It keeps you visible and dry without loose material.
- Avoid loose ponchos and flapping raincoats. They can catch the wind, obstruct the controls, or snag on the footrest, levers or wheel.
- Wear waterproof gloves and boots or shoe covers. Wet, cold hands reduce your control of the brake and clutch levers.
- Protect your belongings. Use waterproof bags or luggage covers and keep your phone, wallet and documents in a waterproof pouch. See our list of bike documents for travel in India.
- Carry a spare pair of gloves on long rides.
Pre-monsoon Motorcycle Check
| Check | What to Inspect |
|---|---|
| Tyres | Tread depth, cuts and correct pressure for the load you carry. |
| Brakes | Pad thickness, disc condition, brake fluid and lever feel. |
| Lights and electricals | Headlight, tail light, brake light, indicators, horn, battery terminals and wiring connectors. |
| Chain and cables | Clean and lubricate the chain; check that cables move freely and are not rusting. |
| Air filter and exhaust | Make sure the air filter is dry and clean, and the exhaust outlet is not blocked. |
| Mirrors and visor | Clean mirrors and a scratch-free visor with working vents or anti-fog protection. |
Other Monsoon Precautions
- Reduce speed noticeably in heavy rain. Ride within the distance you can clearly see.
- Turn on your low beam or DRL so you are easier to see through spray and grey light.
- Avoid riding close to large vehicles that throw up spray and hide hazards.
- Do not ride through areas with fallen electrical wires, uprooted trees, landslide debris or fast-flowing water.
- During thunderstorms or very heavy rain, stop at a safe location away from traffic, trees and hoardings and wait until conditions improve.
23. Beware Of Animals In Rural Areas
Animals like cows, dogs, and goats are common hazards, especially in rural areas or at dawn and dusk. Slow down and be extra careful if you see animals near the road.
24. Assume You May Not Be Seen
Ride as though another road user may not have seen you, even when your headlight is on or you have signalled. Keep space, avoid blind spots and prepare for unexpected turns, lane changes or stops.
25. Avoid Riding When Fatigued
Fatigue reduces concentration, decision-making and reaction time. Warning signs include frequent yawning, heavy eyelids, missing turns, drifting within your lane or struggling to remember the last few kilometres.
On long rides, take regular breaks before you feel exhausted. Drink water, eat light food, stretch and stop for the day if alertness does not return. Coffee or energy drinks may make you feel temporarily awake, but they do not replace proper rest.
26. Stay Focused: Avoid Phones, Earphones And Impaired Riding
Defensive riding requires your full attention. Do not use or hold a mobile phone while riding, including at traffic signals. If you need navigation, set the route before starting, use a secure handlebar mount if necessary, and stop safely before changing the route or replying to calls or messages.
Avoid earphones or headphones that reduce your awareness of horns, emergency vehicles, traffic movement or unusual sounds from your motorcycle. Keep your attention on the road environment rather than relying only on what you can see.
Never ride after drinking alcohol, using recreational drugs, or taking medication that causes drowsiness, dizziness, slower reactions or blurred vision. Even if you feel capable, these factors can reduce the judgment and reaction time needed to handle a sudden hazard.
Stress, anger and lack of sleep can also lead to rushed overtakes, tailgating and poor decisions. If you are tired, upset or unable to concentrate, delay the ride, take a break or use another mode of transport.
27. Practise Peripheral Vision
When riding a motorcycle, tunnel vision means focusing only on a small area ahead, like looking through a tunnel. This can make you miss hazards on the sides, such as merging vehicles or obstacles. Tunnel vision often happens because of stress or inexperience and can be very dangerous.
Defensive riders learn to use their peripheral vision to notice what’s happening around them and respond safely. Peripheral vision is important for defensive riding because it helps you spot hazards from the side without turning your head.
Peripheral vision allows you to:
- Spot moving vehicles entering your lane.
- Notice early turning cues, such as a vehicle drifting, front wheels changing direction or the driver’s head movement before an indicator appears.
- Detect road dangers like potholes or debris.
Using your peripheral vision helps you notice threats sooner and react faster, making your ride safer.
28. What To Do After A Motorcycle Crash Or Fall
After a crash, protect yourself from further danger before thinking about the motorcycle. If you are able to move safely, get away from moving traffic and switch off the ignition. Do not stand in a blind spot, on a curve, or immediately behind another vehicle.
Check yourself and your pillion for injuries. Call emergency services or ask bystanders for help if anyone is injured, unconscious, bleeding heavily, confused, or unable to move normally. Do not remove another person’s helmet unless there is an immediate danger such as fire and it is necessary to keep them safe.
Do not ride away immediately just because the motorcycle appears usable. Check for leaking fuel, damaged controls, bent handlebars, damaged tyres, loose parts, broken lights, fluid leaks or a wheel that does not move freely. If there is any doubt about the motorcycle’s condition, arrange recovery or get it inspected by a qualified technician.
When it is safe, record the location, vehicle details, witness contact details and photographs of the scene. Follow the applicable legal, insurance and police-reporting requirements for the incident.
A minor fall can still affect confidence and concentration. Before riding again, identify what caused the incident and practise the relevant skill—such as braking, scanning, corner entry or low-speed balance—in a controlled environment.
Emergency Riding Skills: Practise Before You Need Them
Defensive riding aims to keep you out of emergencies. Sometimes one happens anyway: a car cuts across, a cow steps out, a chain snaps, or the front wheel starts to shake. In those moments there is no time to work out what to do. Your response is whatever you have rehearsed.
The skills below are general rider-training techniques. Read them, then practise in a safe, empty area with all your gear on, starting at low speed. If you can, learn them with a qualified rider-training instructor. A written description is not a replacement for supervised practice, especially for skid recovery.
| Emergency | First Action | Do Not |
|---|---|---|
| Hazard too close to stop for | Look at the gap, then push the grip on the side you want to go. | Stare at the hazard, or brake hard mid-lean. |
| Front wheel locks | Release the front brake lever, then reapply progressively. | Keep the lever squeezed. |
| Rear wheel skids | Stay upright, look ahead and stay off the front brake if the bike is sliding sideways. | Release the rear brake suddenly when the rear is well out of line. |
| Stuck throttle | Pull the clutch (if fitted) and hit the engine kill switch. | Fumble for the ignition key. |
| Chain snaps | Close the throttle, pull the clutch and brake progressively. | Grab the rear brake hard or look down at the chain. |
| Speed wobble | Ease off the throttle, stay firm but relaxed, and shift weight forward. | Brake hard or fight the handlebars. |
Countersteering And The Emergency Swerve
At anything above walking pace, a motorcycle turns by leaning, and you start the lean by countersteering: pushing the handlebar on the side you want to turn toward. Push the right grip forward and the bike leans and turns right. Push the left grip and it goes left. This happens instinctively for most riders, but many do it weakly, especially in a panic.
Why it matters: in an emergency you may need to change your line in well under a second. A firm, deliberate push on the bar does that much faster than shifting your body weight or trying to steer the bar toward the turn.
- Look first. Find the gap you want to steer into, not the hazard. See target fixation below.
- Push the grip on the side you want to go. A quick, firm push on the inside handlebar starts the lean. Use enough force to move the bike, but stay relaxed elsewhere.
- Keep your grip loose and your arms bent. A stiff, locked-arm grip fights the steering and can make the bike wobble.
- Hold a steady throttle. Do not close it abruptly or open it suddenly while leaning.
- Straighten up by pushing the opposite grip. After you clear the hazard, push the other bar to bring the bike upright. Then continue on a safe line.
- Do not brake hard while leaned over. Finish any hard braking while the bike is upright, then release the brakes and steer. If you must slow a little mid-swerve, do it gently.
Brake or swerve? If there is room to stop in a straight line, braking upright is usually the more controlled option. Swerve when there is not enough distance to stop, and you can see a clear gap to steer into. Never swerve into a lane of oncoming traffic, a footpath with pedestrians, or a gap you cannot see.
How to practise: In an empty car park or ground, place four or five markers (cones, bricks, empty bottles) in a row about 5 to 6 metres apart. Ride through the gaps at 20 to 30 km/h, pushing on the bars to steer left and right around each one. Once this feels smooth, add a pair of markers ahead and swerve around a single marker at slightly higher speed. Increase speed only when you are consistently clean. Wear all your gear, keep a helper watching from a safe place, and stop if the surface is loose, wet or oily.
Target Fixation: You Steer Where You Look
Target fixation happens when you stare at a hazard so intently that you ride straight into it. Your hands tend to follow your eyes. If you fixate on the pothole, the cow or the oncoming truck, your bike drifts toward it, even when there is plenty of empty road on either side.
It is worst when you are surprised, scared or tired, and in situations where a wrong line has serious consequences:
- A pothole, patch of gravel or manhole cover ahead in your lane.
- A cow, dog or pedestrian stepping onto the road.
- A vehicle drifting toward you on a blind ghat bend.
- Entering a corner too fast, when the eyes lock onto the outside edge, the barrier or the drop.
How to train against it:
- Notice the hazard, then look away from it. Take in the pothole or animal with one quick glance, then move your eyes to the clear path you want to take.
- Turn your head, not just your eyes. Point your chin and nose toward the exit of the corner or the gap you are aiming for.
- Keep your vision moving. Fixation is a form of tunnel vision. Use the scanning routine in tip 18 and the peripheral-vision habit in tip 27 so that your eyes do not lock on.
- If you run wide in a corner, look through to the exit and press gently on the inside grip to lean the bike a little more. A motorcycle can usually lean further than new riders expect, and this is often safer than grabbing the brakes or standing the bike up toward the edge. On gravel, oil or wet surfaces, reduce speed early so you never need to do this.
- Use a cone drill. Ride slowly toward a single marker in an empty area and deliberately look at the gap beside it, never at the marker. You will find the bike steers around it. Repeat at gradually higher speeds.
Skid Recovery
Skids most often happen when a wheel locks under hard braking, or when you brake or accelerate on a slippery surface such as wet paint, oil, wet leaves or loose gravel (see tip 22). The right response depends on which wheel is skidding. Remember that ABS (see tip 3) helps prevent wheel lock, but it does not create grip that is not there.
| Skid Type | What You Feel | Recovery |
|---|---|---|
| Front-wheel lock | The handlebars go light or dead. The front slides. Stability is lost very quickly. | Release the front brake lever at once so the wheel turns again, then reapply progressively. Hold the bike upright and look ahead. This is the most dangerous skid, because the front tyre gives you both braking and steering. |
| Rear-wheel lock, bike upright and straight | A squeal or sliding sensation from the rear, with the bike still in line. | Stay calm, keep your eyes up and keep the bike as upright as possible. Use the front brake progressively to slow, with the bike in line. Many training courses teach that a locked rear on a straight bike can be held until you stop, but check with an instructor. |
| Rear-wheel slide, bike sideways | The back end steps out and the bike is no longer pointing where it is travelling. | Do not suddenly release the rear brake or snap the throttle open. If the tyre regains grip while the bike is sideways, it can throw the rider off. Look where you want to go, steer gently in that direction and keep speed as steady as possible. Practise this only with an instructor on a controlled surface. |
| Skid while cornering (oil, gravel, wet paint) | The front or rear slips while leaned over. | Do not brake hard or chop the throttle. Keep the throttle steady, look to the exit, keep the lean smooth and let the tyres reconnect with the road. Then slow down. |
Prevention beats recovery. Check tyres and brakes (tips 1 and 2), brake earlier and progressively on wet roads, avoid painted markings, manhole covers and oil patches when leaned over, and slow down before corners rather than in them.
Stuck Throttle
A stuck throttle means the engine keeps running at high revs or accelerating after you have released the twist grip. It is rare, but it is frightening, and the first few seconds matter. Common causes include a sticky or frayed throttle cable, dirt or rust in the housing, a return spring problem, loose clothing or a glove catching the grip, or a cable that binds when the handlebar is turned.
What to do:
- Stay calm and keep both hands on the bars. Try to close the throttle with your wrist once, but do not spend time on it.
- Pull in the clutch lever (geared motorcycles). This disconnects the engine from the rear wheel, so the revs may scream but the bike will not keep accelerating.
- Hit the engine kill switch (the red rocker switch on the right handlebar on most motorcycles). Learn where it is and practise reaching it without looking. This is faster and safer than reaching for the ignition key, which on some motorcycles can also engage the steering lock if turned fully.
- Brake progressively with both brakes, signal, and move to a safe place at the side of the road. Do not restart the engine until the throttle has been inspected.
Scooters and automatic motorcycles have no clutch lever. On a scooter, go straight to the kill switch and brake firmly but progressively. Do not wait to see if the throttle returns. Many scooter riders never think about where the kill switch is, so find it today.
Prevention: Check that the throttle snaps back smoothly when released. With the engine idling (bike on its stand, in neutral if it has gears), turn the bars from lock to lock. The idle should not rise. Keep the cable lubricated, replace frayed cables, and keep gloves, rain gear and loose items away from the throttle.
Chain Snap
A snapped chain gives you a sudden loss of drive and, occasionally, a chain that whips around. A broken chain can lash your leg, jam against the rear sprocket or wheel, damage the engine casing, or lock the rear wheel. The rider’s greatest risk is the rear wheel locking or the bike becoming unstable.
What to do:
- Close the throttle and pull in the clutch immediately so the engine is not driving the broken chain.
- Keep the motorcycle upright and look ahead. Do not look down at the chain or reach for it while moving.
- Brake progressively with both brakes. If the chain has jammed the rear wheel, you may feel a sudden drag. Do not grab the rear brake hard, and use the front brake gradually.
- Signal and pull off the road to a safe, level place. Keep your feet and legs away from the chain area.
- Do not ride on. Call for recovery and have a mechanic check the sprockets, swingarm and engine casing.
Prevention: Most chain failures are caused by neglect. Clean and lubricate the chain at the interval in your owner’s manual, and more often after riding through rain, mud or dust. Set the chain slack to the manufacturer’s specification. Look for stiff or kinked links, rust, missing or damaged O-ring seals, and hooked or shark-fin sprocket teeth. Replace the chain and both sprockets together as a set. A worn chain on worn sprockets fails much sooner.
Speed Wobble (head Shake)
A speed wobble is a rapid side-to-side oscillation of the front wheel and handlebars. It can start suddenly, usually at moderate to high speed, and can build quickly if handled wrongly. It is often triggered by a bump, a gust of wind, a passing truck’s wind blast, or coming off the throttle over a rough patch.
Common causes:
- Low or uneven tyre pressure, or a badly balanced or worn front tyre.
- Worn or loose steering-head bearings, or a loose front axle or wheel.
- Worn front forks or a bent wheel or frame after an earlier fall.
- Loose or badly balanced luggage, a heavy tank bag or a heavy pillion causing the front to run light.
- Crosswinds and the buffeting from large vehicles on a highway.
What to do:
- Do not brake hard, and do not grab the bars tightly. Fighting the wobble usually makes it worse.
- Hold the bars with a firm but relaxed grip, and let the front end settle.
- Ease off the throttle gradually. Do not chop it suddenly.
- Shift your weight forward and squeeze the tank with your knees. Adding load on the front wheel and tightening your lower body often helps damp the shake.
- Once it settles, slow down gently and pull off the road. Do not accelerate away.
After any wobble, get the motorcycle inspected. Check tyre pressures, the front-tyre balance, the steering-head bearings, forks and wheel alignment before riding again. A wobble is a symptom, and it will come back if the underlying cause is not fixed.
How To Build These Skills
| Skill | Drill | Where and How |
|---|---|---|
| Countersteering and swerving | Cone weave, then single-cone swerve. | Empty ground, start at 20 km/h, increase in small steps. |
| Target fixation | Look at the gap beside a marker, never at the marker. | Low speed first. Then apply on your daily commute by naming your escape space. |
| Emergency braking | Progressive stops from 20, then 30 km/h. | See tip 3. Build up slowly and practise with and without a pillion. |
| Stuck throttle | Locate and touch the kill switch without looking. | With the bike parked, engine off. Repeat until it is automatic. |
| Chain and wobble prevention | Monthly chain, tyre and steering-head check. | At home or with your mechanic, following your owner’s manual. |
| Skid recovery | Instructor-led loose-surface or skid-pad practice. | Only with a qualified instructor. Do not experiment on public roads. |
Practise a little at a time, often, and stop when you are tired. Each drill adds one more automatic response to your defensive-riding toolkit.
Quick Pre-ride Motorcycle Safety Check
Take a minute before every ride to check the motorcycle and your readiness. A short inspection can reveal a problem before it becomes a roadside emergency or affects braking, control or visibility.
| Check | What to Inspect | Do Not Ride If |
|---|---|---|
| Tyres | Pressure, punctures, cuts, embedded objects and tread wear. | A tyre is low, damaged or worn to the minimum tread level. |
| Controls | Front and rear brake feel, clutch action, throttle return, levers and handlebar movement. | Brakes feel spongy or weak, or any control sticks or feels loose. |
| Lights | Headlight, tail light, brake light, indicators and horn. | Any essential light or the horn does not work. |
| Oil and leaks | Engine-oil level per the owner’s manual; fuel, oil or brake-fluid leaks under the bike. | There is a visible leak or the oil level is not correct. |
| Chassis and drive system | Loose fasteners, chain tension, damaged wheels, unusual tyre movement, anything hanging near the wheel or chain. | Anything is loose, damaged or hanging. |
| Stands | Side stand and centre stand retract fully. | A stand does not retract or could interfere with riding. |
| Rider readiness | Properly fitted helmet and suitable riding gear; your own alertness. | You are impaired, severely fatigued, distracted or unable to focus. |
If the motorcycle has a braking issue, damaged tyre, fluid leak, loose control, warning light or any fault that could affect safe operation, do not ride until the problem has been assessed and repaired.
How Defensive Riding Changes In Cities, Ghats, Rural Roads And Highways?
The same defensive-riding principles apply everywhere: scan ahead, maintain space, choose a visible position and ride at a speed that matches what you can see. The main difference is the type of hazard you should expect.
City Riding: Expect Close-range Conflicts
- Reduce speed near junctions, U-turn openings, bus stops, markets, schools, parked vehicles and construction areas.
- Watch for doors opening, pedestrians stepping out, autos stopping suddenly and vehicles changing lanes without warning.
- Keep an escape space rather than filtering into a gap that may close.
- Use mirrors and a shoulder check before every lane change or merge.
Rural Roads And Village Stretches: Expect Less Warning Time
- Ride within the distance you can see clearly, especially near blind curves, hill crests, village entrances and unlit stretches.
- Expect animals, pedestrians, tractors, parked vehicles, damaged surfaces, loose gravel and unmarked speed breakers.
- Leave more space behind large vehicles because they can hide hazards ahead and create spray, wind turbulence or sudden braking situations.
- Overtake only when the road is fully visible, the manoeuvre is legal and there is enough distance to finish without relying on another driver to react.
Ghat And Hill Roads: Expect Blind Bends And Long Descents
Ghat roads combine tight bends, gradient changes, limited visibility and changing weather. Ride at a pace that lets you stop within the distance you can see, and treat every blind bend as if a vehicle could be coming the other way, possibly on your side of the road.
| Situation | Main Risk | Safer Approach |
|---|---|---|
| Hairpin bends | Vehicles swing wide or cut the corner, and the gradient is often steepest on the inside of the bend. | Slow down before the bend, stay in your lane, use a low gear and never overtake on or just before a hairpin. |
| Blind curves | You cannot see oncoming vehicles, animals or debris until you are very close. | Reduce speed, keep to the left, and use a short horn or pass light to signal your presence. Do not assume anyone has heard or seen you. |
| Long descents | Continuous braking can overheat the brakes and reduce stopping power. | Stay in gear, use engine braking and apply the brakes in short, controlled intervals. Stop and let them cool if they feel weak or spongy. |
| Steep climbs with a pillion or luggage | The engine can struggle, and stalling on a slope is dangerous. | Downshift early, keep steady momentum and leave extra room ahead in case the vehicle in front rolls back or stalls. |
| Unguarded edges and drop-offs | A small mistake can have severe consequences. | Keep a safe distance from the edge and never stop or park close to it. |
| Landslide debris, gravel and wet patches | Loose stones, mud and water seepage reduce grip, especially in the monsoon. | Slow down, avoid braking or leaning over debris and watch for fresh fallen rocks after rain. |
| Fog and low cloud | Visibility can fall suddenly, and other vehicles may be hard to see. | Use low beam, slow down, increase your gap and stop in a safe, wide place if you cannot see the road clearly. |
- Right of way on narrow hill roads. Many riders and drivers give way to uphill traffic because it is harder to restart on a slope, but this is a courtesy, not a guarantee. Follow local signs and instructions, and let whoever has the safer space to pull over do so.
- Do not overtake on bends or near crests. Wait for a straight stretch where you can see the full length of the manoeuvre. See tip 4 for the overtaking checklist.
- Watch for animals and pedestrians. Cattle, dogs, monkeys, goats and people often use ghat roads, particularly near villages, temples and viewpoints.
- Stop only where it is safe. Use a wide pull-off or viewpoint rather than a bend, blind curve or narrow shoulder. Switch on your hazard lights if you must stop briefly.
- Plan for fuel and weather. Fill up before a long ghat section, check the forecast and carry rain gear, as weather can change quickly at altitude. For more on wet conditions, see tip 22.
- Do not coast in neutral on descents. See tip 7.
Highways: Expect Higher Speeds And Sudden Conflicts
Highways give you less time to react. Higher speeds increase stopping distance, and trucks, buses, tractors, pedestrians and wrong-side vehicles can appear in places you do not expect.
| Highway Hazard | What Can Happen | Safer Approach |
|---|---|---|
| Wrong-side vehicles and riders | A vehicle appears head-on in your lane, often near dhabas, villages or median gaps. | Stay in your lane, keep to the left, scan well ahead and slow down near villages and junctions. |
| Dhaba, petrol-pump and side-road exits | Vehicles turn in or pull out suddenly, often without signalling. | Reduce speed, cover the brakes and watch for brake lights, indicators and turning wheels. |
| Median gaps and U-turns | Vehicles cross your path from the right. | Slow down and be ready to stop, even when you have priority. |
| Truck and bus wind blast | Passing or being passed by a large vehicle can buffet the motorcycle. | Keep a relaxed grip, hold your line, avoid sudden steering and increase the gap. |
| Crosswinds | Gusts push the motorcycle sideways, especially on bridges, open stretches and gaps between hills. | Reduce speed, keep a firm but relaxed grip and be ready for a sudden push when leaving shelter. |
| Tyre failure or sudden loss of pressure | The bike may wobble or feel unstable. | Hold the handlebars steady and ease off the throttle. Do not brake hard. Once the bike is stable and speed has dropped, brake gently and pull off the road. |
| Stopped or slow vehicles without lights | Broken-down trucks, tractors and carts can be almost invisible at night. | Ride within your visible stopping distance. See tip 9. |
| Pedestrians and animals crossing | People and animals cross without warning near bus stops, villages and gaps in the barrier. | Slow down, scan wide and be prepared to stop. |
- Prepare before a long highway ride. Check tyre pressure (adjusting for load), tyre condition, chain, brakes, lights and fuel. See the pre-ride safety check.
- Choose your lane sensibly. Slower riders should stay to the left and avoid remaining beside large vehicles. See tip 16.
- Follow posted speed limits. Limits differ by road type and vehicle category and may change from stretch to stretch. Ride to the conditions, not just the limit.
- Check where two-wheelers are allowed. Many access-controlled expressways do not permit two-wheelers. Check the rules and signs for your route before you start.
- Take regular breaks. Long stretches of straight road can make you drowsy. See tip 25.
- If you must stop on the highway, move as far off the carriageway as possible, switch on the hazard lights, and wait well away from traffic, ideally behind a barrier. In an emergency, call 112.
- Ride in groups sensibly. Keep a staggered formation on open roads, do not race, and agree on stops and hand signals before you set off.
In all environments, reduce speed and increase following distance when rain, darkness, poor surface grip or restricted visibility reduce your time to respond.
Common Defensive-riding Mistakes And Safer Alternatives
Riders of every experience level can develop habits that reduce their time and space to respond. The table below pairs common mistakes with safer alternatives.
| Mistake | Safer Alternative |
|---|---|
| Following too closely | Keep at least a two-second gap in normal dry conditions. Increase it in rain, darkness, poor visibility, or behind heavy vehicles. |
| Overtaking with limited visibility | Wait until the road ahead is clear, the manoeuvre is legal, and there is enough distance to complete it without forcing another road user to react. |
| Looking only at the vehicle ahead | Scan well ahead, check mirrors before changing speed or direction, and identify an escape space before a hazard develops. |
| Riding beside a bus or truck | Avoid remaining in blind spots. Create space, stay where the driver is more likely to see you, and pass only when it is safe and legal. |
| Staring at a pothole or obstacle | Identify the hazard, then look toward the safe path you want to take. Slow down before a corner and use smooth steering inputs. |
| Leaving an indicator on | Use indicators early, check that they cancel after every turn or lane change, and switch them off manually when needed. |
| Skipping gear or readiness checks | Wear a properly fitted helmet and suitable protective gear. Before riding, check the tyres, controls, lights, fluids, chassis, stands and your own alertness. |
New riders can also read our guide to the two-wheeler licence process in India.
What Are Some Common Myths About Defensive Riding For Bikers In India?
Myth 1: “slow Speed = Always Safe.”
Lower speed can reduce crash severity, but speed alone does not make a ride defensive. A rider can still be at risk when travelling slowly in a blind spot, following too closely, entering a junction without scanning or filtering through a shrinking gap.
- Defensive motorcycle riding is about anticipation, smart lane positioning, having an escape plan, and making yourself visible—not just keeping your speed down.
- Crawling along in the wrong lane, riding in blind spots, or staying too close to buses and trucks can actually be riskier than riding a little faster with better positioning and enough space around you.
Myth 2: “loud Exhaust / High Beam = Better Visibility.”
A loud exhaust or constant high beam does not replace correct road position, speed control and clear signalling. Excessive noise can be disruptive, while high beam can create glare for other road users. Use lighting considerately and switch to low beam when following traffic or facing oncoming vehicles.
- Defensive visibility means standing out without being aggressive. Use your low beam correctly, wear reflective gear, choose your lane carefully, and use the horn only when it’s really needed.
- If you use high beams all the time in the city or tailgate with your high beams on the highway, you can blind other drivers and make them angry. This is the opposite of defensive riding.
Myth 3: “if I Have Right Of Way, I’m Safe.”
Many riders believe that if they are legally ‘right,’ such as having a green signal or being on a straight road, they don’t need to ride defensively. But being correct doesn’t always keep you safe. Buses, trucks, tractors, or distracted drivers can still hit you if you assume everyone will follow the rules.
- Defensive riding means always preparing for the worst: cross traffic might run a red light, parked vehicles could suddenly U-turn without warning, and pedestrians might step into the road out of nowhere.
- Your main goal should be to stay safe first and worry about being ‘right’ later. Give yourself space to escape, keep your brakes ready, and slow down at junctions, even if the signal is in your favour.
Myth 4: “good Skills / Abs / Big Bike Will Save Me.”
Better brakes, rider aids and experience can support safer riding, but they do not remove the need for space, speed control, scanning and sound judgement. Extra power or confidence can still encourage a rider to take risks in busy traffic.
- ABS, traction control, and strong brakes will help only if you’ve already left enough space, looked ahead to spot problems early, and are always mentally a step ahead of traffic.
- Defensive riding on Indian roads means choosing to ride below your personal skill level, especially at night, in the rain, or when you are near buses, autos, and village traffic.
Myth 5: “defensive = Timid / Always Giving Way.”
Some riders think defensive riding means being slow, hesitant, or always giving way in traffic, never overtaking or holding your lane. In reality, defensive riding is about being calm, decisive, and assertive when needed. Hesitating during an overtake or drifting without confidence can confuse other drivers and cause accidents.
- A true defensive rider plans overtakes, uses indicators and clear lane changes, and avoids squeezing into shrinking gaps where others can’t predict your movement.
- The goal is to be predictable and visible, not aggressive or timid. Hold your lane firmly, use clear signals, and only compete for space when it actually makes you safer, not just to boost your ego.
Frequently Asked Questions About Defensive Motorcycle Riding
1. Does Defensive Riding Mean Riding Slowly?
No. It means choosing a speed that matches your view ahead, road surface, traffic, weather and available escape space. A safe speed may be lower in rain, at night, near junctions or behind large vehicles.
2. How Much Distance Should I Keep From The Vehicle Ahead?
Use at least a two-second gap in normal dry conditions, then increase it when visibility or grip is reduced, when carrying a pillion, or when following buses, trucks and other vehicles that block your view.
3. Is A Helmet Mandatory For The Pillion Rider In India?
Yes. Under Section 129 of the Motor Vehicles Act, both the rider and the pillion must wear a protective helmet that meets the BIS standard (ISI mark, IS 4151:2015), with the strap fastened.
4. What Are The Rules For Carrying A Child On A Motorcycle In India?
For a child up to four years old, a safety harness that attaches the child to the rider and a crash helmet are mandatory, and the motorcycle must not exceed 40 km/h. This comes from the 2022 amendment to Rule 138 of the Central Motor Vehicles Rules. Check the latest notification on the Parivahan website before you ride, as rules and enforcement can change.
5. Is It Safe To Ride Through A Waterlogged Road?
Only if the water is shallow, still and you can clearly see the road surface. If you cannot judge the depth, if the water is flowing, or if it could reach the exhaust outlet or engine, do not ride through it. Turn back or wait.
6. How Should I Brake On Wet Roads?
Brake earlier and more progressively than on a dry road, using both brakes, with the motorcycle upright. After riding through deep water, lightly apply the brakes a few times at a safe speed to help clear water from the discs and pads.
7. How Should I Ride On Ghat Roads?
Slow down before bends, stay in your lane, use a low gear on climbs and descents, and avoid overtaking near hairpins and blind curves. Use short horn signals on blind corners, but never assume that other road users have heard you.
8. What Should I Do If My Tyre Bursts On The Highway?
Hold the handlebars firmly, ease off the throttle and avoid braking hard or steering sharply. Let the speed drop, then brake gently and move to a safe place away from traffic.
9. Can I Use A Phone Or Earphones While Riding?
No. Set navigation before the ride, secure the phone if needed and stop safely before changing directions, taking calls or reading messages. Avoid earphones that reduce awareness of traffic and emergency vehicles.
10. What Is The Difference Between Defensive Driving And Defensive Riding?
Both mean anticipating hazards and keeping space to react. Defensive riding applies these ideas to motorcycles and scooters, where balance, visibility, road surface, protective gear and lane position matter more than they do in a car.
Official Road-transport Resources
Other Related Links From Bikeleague India
- Must have bike documents for travel in India
- Braking in motorcycle – All expert tips for bikers
- Electric scooter maintenance – Top tips for longevity
- Two Wheeler License in India: Full guide to types & process
- Motorcycle fuel – Types, things to know & take care in India
Conclusion
Defensive riding means creating time, space and options before a hazard becomes an emergency. Scan ahead, maintain a safe buffer, stay visible, ride within the conditions and keep your motorcycle and protective gear ready for every journey.
Build these habits gradually. Practise one skill at a time in a safe environment, then apply it consistently in daily traffic, on rural roads and during longer rides.
If you have questions or need further guidance, contact us at bikeleagueindia@gmail.com or connect with Bikeleague India on social media.