Long story short: Learn about motorcycle suspension settings, including preload, compression, and rebound adjustments in motorcycles in India. This guide also explains the best suspension setup for Indian roads for better comfort and control.
Suspension is one of the most important but often misunderstood parts of a motorcycle, especially for everyday riders in India. How you set up your suspension can completely change how your bike feels, handles, and keeps you comfortable on rough city streets, highways, and off-road trails.
This guide will cover the basics of front and rear suspension, explain key terms like preload, compression, and rebound, and show you how to adjust your setup for Indian roads. No matter if you ride a classic commuter or a modern adventure bike, understanding your suspension is the first step to a smoother, safer, and more enjoyable ride.
Key Takeaways
- Suspension setup dramatically affects comfort, safety, and handling for everyday riders—not just racers.
- Key suspension terms to understand are preload, compression damping, and rebound damping, each influencing how your bike responds to different loads and road conditions.
- Adjusting preload is the simplest way to tailor your ride for solo, pillion, luggage, or rough Indian roads, and most bikes make it easy to do so.
- Recognising if your suspension is too soft or too stiff helps you fine-tune for better grip, stability, and reduced rider fatigue.
- Regularly reviewing and experimenting with your suspension settings ensures your motorcycle stays comfortable and controlled as your riding style and conditions change.
Basics Of Front And Rear Suspension Settings In Motorcycles
Most Indian motorcycles have two main suspension types at the front and rear. At the front, you’ll usually find either telescopic forks (the classic, tube-like shock absorbers you see on most bikes) or USD (upside-down) forks, which are more common on sportier models.
At the rear, classic commuter bikes often use dual shock absorbers—these are the two separate springs you’ll spot on either side of the back wheel. In contrast, more modern sport and adventure bikes typically feature a single monoshock, which is hidden under the seat and attached to the swingarm.
Let’s look at some real-world examples:
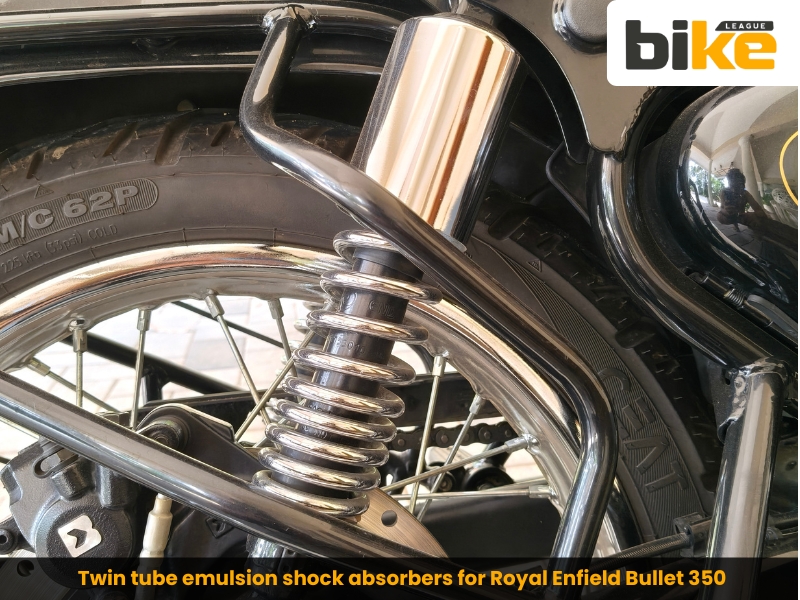
- Royal Enfield Bullet 350: Telescopic 41 mm front fork (about 130 mm travel), twin-tube emulsion rear shocks with 6-step adjustable preload.
- TVS Apache RTR 160 4V: Telescopic front fork and a rear monoshock with preload adjustment.
- Hero XPulse 200 4V: Long-travel 37 mm telescopic front fork (around 190 mm travel) and a 10-step preload-adjustable rear monoshock (about 170 mm travel) for off-road riding.
- KTM 390 Duke: WP APEX USD forks at the front with separate compression and rebound adjusters, plus an adjustable rear WP APEX monoshock with rebound and multi-step preload adjustment.
The type of suspension your bike has is important, but how you adjust the settings makes the biggest difference in how your motorcycle feels on the road.
What Is Preload?
Preload is how much the spring is compressed before the suspension starts to move under the bike’s weight.
- When you increase preload, the bike sits a bit higher, there’s less sag, and the first part of the suspension feels firmer.
- Lowering the preload lets the bike sag more, making the bike feel softer and more comfortable at the start of the stroke.
If your bike has twin shocks, you usually adjust preload in steps. For bikes with a monoshock, you change preload by turning collars or rings.
| Preload Setting | Effect | When to Use |
|---|---|---|
| Low | More sag, softer initial travel | Solo light rider, comfort priority |
| Medium | Balanced sag | Solo + light luggage, mixed roads |
| High | Less sag, firmer feel | Pillion, heavy luggage, stability |
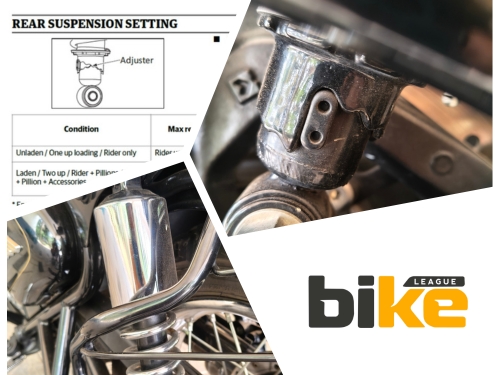
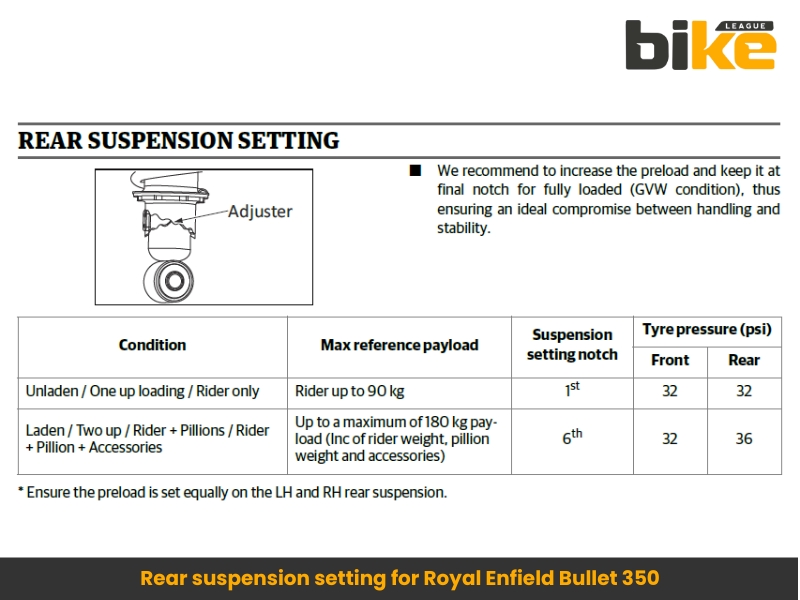
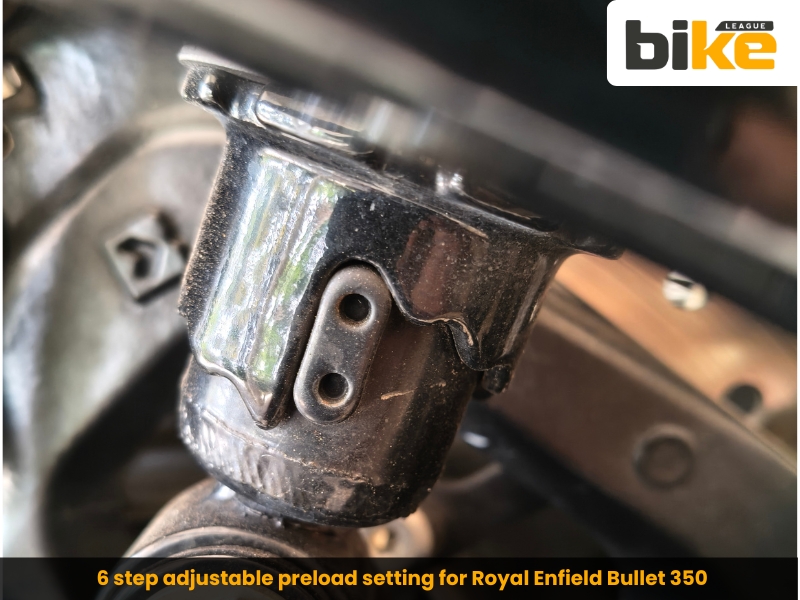
Example: Royal Enfield Bullet 350 – 6‑step Rear Preload
The Bullet 350 comes with twin rear shocks and 6‑step adjustable preload from the factory.
A practical way to use the steps:
- Step 1: Solo rider, lighter weight, mostly good city roads.
- Step 2–3: Rider plus pillion or some luggage.
- Step 4–5: Regular pillion plus luggage, or heavier combined load.
- Step 6: Maximum load—heavy rider, pillion, and luggage, or very bad roads.
When you carry more weight, choose a higher step to stop the suspension from sagging too much or bottoming out.
Example: Hero XPulse 200 4V – 10‑Step Rear Preload
The XPulse 200 4V’s rear monoshock offers 10 preload settings in addition to its long travel.
- Lower steps: Softer, more sag, good for solo light rider and technical trail grip.
- Higher steps: Better support for luggage or pillion on tours and at higher speeds on rough highways.
Since the XPulse is built for both adventure and trail riding, changing the preload lets you easily switch between city and off-road use, or carry extra luggage for touring.
What Is Compression Damping In Motorcycles?
Compression damping in motorcycles controls how quickly the suspension compresses when you go over a bump, brake hard, or land after a jump.
- More compression damping (stiffer): The fork/shock resists compressing, improving stability under braking and reducing front‑end dive, but it can feel harsh on sharp bumps.
- Less compression damping (softer): The suspension compresses more easily, improving comfort and bump absorption, but too soft can cause excessive dive and bottoming.
On many budget and mid-range Indian bikes, compression damping is fixed inside the suspension and can’t be changed. High-end models like the KTM 390 Duke have external adjusters you can use:
KTM 390 Duke (current model):Front WP APEX USD fork with 5‑click compression and 5‑click rebound adjusters; rear monoshock with rebound and 10‑step preload adjustability. This allows genuine track‑style tuning on an Indian‑market naked bike.
| Setting | Effect | Best For |
|---|---|---|
| Soft | Easy compression, plush ride | Potholes, rough roads |
| Medium | Balanced | Mixed conditions |
| Stiff | Resists dive, stable braking | Highways, sport riding |
What Is Rebound Damping?
Rebound damping controls how fast the suspension returns to its normal position after being compressed.
- Too little rebound (very fast return): The bike can feel bouncy or “pogo‑stick” like, especially after a speed breaker.
- Too much rebound (very slow return): The suspension may not fully extend before the next bump, leading to a packed‑down feeling and loss of travel.
Many performance bikes and some high-spec adventure bikes let you adjust rebound. For example, the KTM 390 Duke’s rear shock lets you control how quickly it returns, so you can choose a more comfortable or sportier ride.
| Setting | Effect | Signs You Need It |
|---|---|---|
| Fast rebound | Quick return, lively feel | Bike feels “packed down” |
| Medium | Balanced control | Most street riding |
| Slow rebound | Controlled return | Bouncy “pogo” feel |
Stiff Vs Soft Motorcycle Suspension Settings
When riders talk about “stiff” or “soft” suspension, they usually mean the overall feel from spring rate, preload, and damping settings.
What Is A Stiff Setup?
A stiff setup typically means:
- Higher preload
- More compression damping
- Often slightly more rebound damping
Pros
- Very stable at high speeds and during hard braking.
- Sharper, more precise feeling while cornering on smooth tarmac.
- Less fork dive and less rear squat under acceleration.
Cons
- Harsher over potholes and broken patches.
- Can reduce grip on very uneven roads, as the tyre may skip instead of following the surface.
Example – Ktm 390 Duke
The 390 Duke’s adjustable WP suspension is designed for aggressive street and track use. Increasing compression and rebound, and running slightly higher preload, works well for:
- Track days
- Ghat‑section cornering with good tarmac
- Spirited solo riding
You’ll get more precise control and feedback, but you’ll also feel every bump in the road.
What Is A Soft Setup?
A soft setup usually involves:
- Lower preload
- Less compression damping
- Rebound is usually set to medium‑slow to keep the tyre planted.
Pros
- More comfortable over potholes, speed breakers, and rough village roads.
- Better traction on loose or uneven surfaces, as the wheel follows the terrain more easily.
Cons
- Excessive dive under braking or wallowing in fast corners.
- With heavy loads or big bumps, the suspension might reach its limit.
Example – Hero Xpulse 200 4v
The XPulse’s long-travel suspension and adjustable preload are designed for rough roads and trails. Using lower to mid preload with the standard damping gives you:
- Plush ride over stones, broken tarmac, and trail obstacles.
- Great grip while standing up and riding off‑road.
If you carry luggage or ride fast on the highway, increase the preload to stop the bike from squatting or bottoming out.
| Aspect | Stiff Setup | Soft Setup |
|---|---|---|
| Preload | High | Low |
| Compression | High | Low |
| Rebound | Medium-fast | Medium-slow |
| Best Roads | Smooth highways, tracks | Potholes, trails |
| Pros | Precise handling, stability | Comfort, traction |
| Cons | Harsh on bumps | Wallows, bottoms out |
Real‑world Indian Motorcycle Model Suspension Setting Scenarios
1. Royal Enfield Bullet 350 – City + Occasional Pillion
Hardware:
- Telescopic front fork, rear twin shocks with 6‑step adjustable preload.
Suggested Use:
- Daily city solo rider: Rear shocks on step 1–2 for comfort and better bump absorption.
- Regular pillion: Move to step 3–4 to prevent bottoming out over big potholes and speed breakers.
- Pillion plus luggage on long rides: Steps 5–6, along with correct tyre pressures, to maintain stability at higher speeds.
In this case, you are only changing the preload, not the damping, but it still makes a big difference in how the bike feels.
2. Tvs Apache Rtr 160 4v – Sporty City Rider
Hardware:
Telescopic front fork, rear monoshock with preload adjustment, sporty double‑cradle frame.
Use Case 1 – Daily Commute, Bad Roads:
- Keep rear preload near the softer side for better comfort and grip on broken tarmac.
- Since you can’t adjust the damping on this bike, your main options are changing preload and tyre pressure.
Use Case 2 – Weekend Spirited Rides:
- Increase rear preload by 1–2 steps to reduce squat and quicken turn‑in.
- This gives a more connected, sporty feel, though you will sacrifice some comfort.
On similar models like the Apache RTR 200 4V, which has front preload adjustment, you can also fine-tune the fork preload to control dive and improve how the bike turns.
3. Hero Xpulse 200 4v – Mixed City And Off‑road
Hardware:
37 mm telescopic front forks with long travel and a 10‑step preload‑adjustable rear monoshock.
Use Case 1 – City + Bad Monsoon Roads:
- Set rear preload to a mid step (around 4–6).
- This setting gives a comfortable ride over rough roads and stops the rear from sagging too much when you have a passenger.
Use Case 2 – Trail/off‑road Rides:
- Use a slightly lower preload (around 3–4) for more sag and maximum traction.
- The long-travel suspension lets the bike handle ruts, rocks, and other trail bumps without making you lose balance.
Use Case 3 – Fully Loaded Touring:
Increase rear preload to higher steps (7–9) to maintain ride height and prevent bottoming with luggage and occasional pillion.
4. Ktm 390 Duke – Fine‑tuning For Track Vs Street
Hardware:
- WP APEX USD forks with separate compression and rebound adjusters.
- Rear WP APEX monoshock with rebound and multi‑step preload adjustment.
Street / Indian Highways:
- Preload: Medium, to maintain correct sag for your weight.
- Compression: Middle or one click softer than centre for some compliance over rough patches.
- Rebound: Middle, for a balance between control and comfort.
Track / Aggressive Riding:
- Preload: Slightly higher to reduce sag and improve edge grip.
- Compression: One or two clicks stiffer for better braking stability and mid‑corner support.
- Rebound: Adjust slightly faster if the bike feels lazy on the way up out of corners, or slightly slower if it feels bouncy on exits.
This setup is a good example of a fully adjustable suspension that Indian riders can find in the middleweight naked bike category.
How To Tell If Your Suspension Is Too Soft Or Too Stiff
If you’re not sure whether your bike’s suspension is set up right, here are some signs it might be too soft or too stiff:
Signs Your Suspension Is Too Soft
- The bike dives heavily under braking.
- The rear squats noticeably during acceleration.
- You frequently bottom out over big potholes or speed breakers.
- At speed, the bike feels wallowy or vague in long corners.
Signs Your Suspension Is Too Stiff
- Harsh, jarring ride over sharp bumps and broken surfaces.
- The tyre feels like it skips or hops over rough sections instead of tracking them.
- The front end chatters or loses grip on uneven corners.
- You feel unusually tired after riding the same route because of constant impacts.
Tip: If the front feels stiff and the rear feels soft, or vice versa, try balancing both ends before making smaller adjustments.
What Is The Step‑by‑step Setup For Motorcycle Suspension Setting For Indian Conditions?
You don’t need to be a professional racer to set up your motorcycle’s suspension for Indian roads. Here are a few simple steps to help you get the best out of your bike:
- Check the owner’s manual: Begin by reviewing what your manual says about stock preload positions and any recommendations for riding solo, with a pillion, or with luggage.
- Understand the adjusters: Most Indian manuals and brand websites offer clear guidance on how to use the preload and damping adjusters. Familiarise yourself with these controls.
- Set your sag: Adjust preload so that the suspension sags by about 25–30% f its total travel when you sit on the bike, especially for models like the XPulse and Due, where travel figures are available.
- Adapt for load and riding style:Use higher r steps for heavier loads or aggressive riding, and lower steps for so or comfort-focused riding.
- Balance comfort and control: If you find that the ride is too harsh but you’re not bottoming out, try softening the preload a little or reducing compression damping (if your bike allows it). If your bike feels too bouncy over bumps, increase rebound damping in motorcycles a click or two models with this option.
- Change one thing at a time: Make only one adjustment at a time—either one or two–2 clicks on a single 1 preload st—then ride the same stretch of road to notice the effect.
- Keep notes:Write down your settings for preload, rebound, compression, and tyre pressures. This makes it easy to return to a setup you liked before, or to track what works for you.
- Re-check after changes: Whenever you add luggage, start carrying a passenger more often, or plan a r switch from city rings to long highway or off-road trips, check your suspension and tyre pressures again for optimum comfort and safety.
What Are The Suspension Settings For Special Conditions Like Long-distance Touring, Extreme Off-road, Or Monsoon Conditions?
Standard setups work for daily riding, but tough conditions need special adjustments. Here’s some detailed advice for long-distance touring, extreme off-road, and monsoon riding, all tailored for Indian bikes and roads.
1. Long-distance Touring
Goal
Comfort for 500+ km days, stability with luggage/pillion, fatigue reduction. Prioritise plush absorption + load support.
Key Changes
- High preload: Match total loaded weight (you + pillion + 20-30kg luggage).
- Medium compression: Absorbs repeated highway bumps without bottoming.
- Medium-slow rebound: Prevents bouncing on expansion joints.
- Tyre pressure: +4-6 PSI over stock for stability.
- Sag: 25-30% loaded (measure!).
Touring Settings Table
| Tips | Bullet 350 | XPulse 200 | KTM 390 Duke | Non-Adjustable (Shine) |
|---|---|---|---|---|
| Rear | Step 5-6 | 7-9 | High (10-step max) | N/A |
| Stock | Stock | Stock (soft) | Medium (2 clicks soft) | Service forks |
| Stock | Stock | Stock | Medium-slow | Rear shocks upgrade |
| Panniers low/center; tank bag only | Panniers low/center; tank bag only | Soft bags, | Top box + side cases balanced | Low luggage position |
Pro Tips: Test your bike with a full load before your ride. Add bar risers for extra comfort. Check the sag every 500 km, as luggage can shift during long trips.
2. Extreme Off-road
Goal
Maximum traction, wheel contact, and prevent bottoming on rocks/rocks/jumps.
Key Changes
- Lower preload: More sag (30-35%) for compliance.
- Soft compression: Absorbs chatter without packing.
- Slow rebound: Keeps wheels planted on whoops/rocks.
- Lower tyre pressure: 15-20 PSI (tubes/mousse for punctures).
- Standing position: Weight off the seat.
Off-road Settings Table
| Bike | Preload | Compression | Rebound | Tyre PSI |
|---|---|---|---|---|
| XPulse 200 | Rear Step 3-5 | Stock (softest) | Stock slow | 16/18 |
| KTM 390 Duke | Low-medium | Soft (3-4 clicks) | Slow (3 clicks) | 18/20 |
| Bullet 350 | Rear Step 2-3 | Aftermarket soft shocks | N/A | 20/22 (knobbies) |
| Pulsar NS200 | N/A | Progressive fork springs | Gas shocks | 18/20 |
Pro Tips: Use zip-ties on your forks or shocks to monitor suspension travel. Stand up for about 70% of rough sections. Always carry spare tubes or sealant.
3. Monsoon Conditions
Goal
Traction first, progressive damping for hidden potholes, and avoid hydroplaning.
Key Changes
- Medium preload: Balance traction + prevent dive.
- Medium compression: Progressive for water-filled potholes.
- Medium-fast rebound: Quick recovery for slippery braking.
- Tyres: Wet-grip (MRF Nyloneer, CEAT Gripp XL); pressures stock or -2 PSI.
- Slow speeds: Suspension can’t save aggressive riding.
Monsoon Settings Table
| Bike | Preload | Compression | Rebound | Extra |
|---|---|---|---|---|
| Apache RTR 160 | Medium | Stock | Medium | Rain chains |
| XPulse 200 | Step 5-6 | Soft | Medium-fast | Handguards |
| KTM 390 | Medium | 1 click soft | Fast (2 clicks) | Crash guards |
| Activa (Scooter) | N/A | Gas rear shocks | Fresh fork oil | Skid plate |
Pro Tip: Avoid riding through water that is as deep as your tailpipe or deeper. Use second gear in puddles. Make sure your brakes work in the rain. Use handguards and a tall screen for better visibility.
Universal: Universal Tip: Always switch back to your regular street settings after special riding conditions. Keep a record of any changes you make.
How Lowering/raising Suspension (for Height Adjustment) Changes Stability And Cornering
Riders often lower bikes for shorter heights (women, teens) or raise them for touring clearance. These changes alter bike geometry (rake, trail, centre of gravity), dramatically affecting handling. Here’s what happens:
Lowering The Bike
How: Short shocks (₹8-12k aftermarket), fork spacer kits, or pulling forks through triples.
| Effect | Lowering Rear | Lowering Front |
|---|---|---|
| Stability | Better high-speed stability (longer wheelbase, more caster/trail). Great for highways. | Less high-speed stability (less trail). Feels twitchy above 100 km/h. |
| Cornering | Heavier steering, understeer (resists leaning). Pegs scrape sooner. | Quicker steering, but oversteer (rear slides first). Unpredictable. |
| Braking | More stable (rake helps). | Less stable (reduced trail). |
| Ground Clearance | Reduced (scrapes speed breakers). | Reduced (front tyre hits first). |
| Best For | Highway touring, shorter riders, pillion comfort. | Rarely recommended alone. |
Example: Bullet 350 lowered 25mm rear → easier feet-down stops for 5’4″ riders, stable Mumbai-Pune expressway runs, but needs cornering caution (understeer).
Raising The Bike
How: +25-50mm shocks, fork extensions, dogbone/linkage risers.
| Effect | Raising Rear | Raising Front |
|---|---|---|
| Stability | Less braking/high-speed stability (less caster). Wallower under hard stops. | Very stable at speed (more trail). |
| Cornering | Quicker steering, oversteer (rear slides). More ground clearance. | Heavier steering, understeer. Pegs last longer. |
| Braking | Less stable (reduced rake). | Better stability. |
| Ground Clearance | Improved (off-road/trails). | Improved. |
| Best For | Extreme off-road (Spiti), track cornering. | Highway stability, tall riders. |
Example: XPulse 200 raised 30mm rear → Spiti Valley rocks no problem, quick dirt cornering, but Mumbai local roads feel tall/unstable when braking.
Geometry Changes Explained
Stock Geometry:
rake: 26° | trail: 100mm | wheelbase: 1370mm
Lower Rear 25mm:
rake: 27.5° ↑ | trail: 110mm ↑ | wheelbase: 1380mm ↑ → MORE STABLE, HEAVIER STEERING
Raise Rear 25mm:
rake: 24.5° ↓ | trail: 90mm ↓ | wheelbase: 1360mm ↓ → QUICKER, LESS STABLE
Key Rule: Always adjust front + rear together. Lowering only the rear makes it front-heavy and unstable. Raising only rear = rear-light, wheelie-prone.
Practical Height Adjustment Guide
| Goal | Recommended Change | Example Bike | Cost |
|---|---|---|---|
| Shorter rider | Lower rear 20-30mm | Bullet 350, Versys | ₹8-12k shocks |
| Off-road | Raise rear 30-40mm | XPulse, Himalayan | ₹12-18k shocks |
| Highway stability | Lower rear 15-25mm | Duke 390, NS200 | Fork spacers + shocks |
| Pillion touring | Lower rear 20mm | RE Interceptor | Balanced luggage low |
Safety Notes:
- Max 30-40mm change total (10-15% travel loss).
- Test familiar corners after changes.
- Re-check sag (25-30% loaded).
- Match front/rear changes proportionally.
Indian Reality: Most lowering kits for RE Classics, Apache, and Pulsar are available on Amazon. Professional install recommended (₹1-2k).
How Lowering / Raising Suspension Effects On Stability & Cornering?
Riders often lower bikes for shorter heights or raise them for touring clearance. These changes alter bike geometry (rake, trail, wheelbase), dramatically affecting handling. Here’s what happens:
Quick Geometry Definitions
- Rake: Steering head angle from vertical (more = fork more “laid back”).
- Trail: Distance from steering axis ground contact to tyre contact patch.
- Wheelbase: Front-to-rear axle distance.
More rake + trail + longer wheelbase = slower, more stable steering.
Less rake + trail + shorter wheelbase = quick steering, less stable.
Lowering The Bike
How: Short shocks, fork spacers, sliding forks up in triples.
| Effect | Lowering Rear | Lowering Front |
|---|---|---|
| Geometry | ↑ Rake, ↑ Trail, ↑ Wheelbase | ↓ Rake, ↓ Trail, ↓ Wheelbase |
| Stability | Better high-speed (more trail) | Less stable (less trail) |
| Cornering | Heavier steering, understeer | Quicker, oversteer risk |
| Best For | Highways, short riders | Rarely alone |
Example: Bullet 350 lowered 25mm rear → easier feet-down, stable Mumbai-Pune runs, but understeers in corners.
Raising The Bike
How: Longer shocks, fork extensions, dogbone risers.
| Effect | Raising Rear | Raising Front |
|---|---|---|
| Geometry | ↓ Rake, ↓ Trail, ↓ Wheelbase | ↑ Rake, ↑ Trail, ↑ Wheelbase |
| Stability | Less braking stability | Very stable |
| Cornering | Quicker, oversteer | Heavier, understeer |
| Best For | Off-road, track | Highways |
Example: XPulse raised 30mm rear → Spiti rocks cleared easily, quick dirt turns, but braking feels light.
Geometry Diagram (static → Loaded)
Stock (neutral)
rake: 26° | trail: 100mm | wheelbase: 1370mm
Rear Preload High (less Rear Sag)
rear ↑ → nose down → ↓ rake (25.5°), ↓ trail (95mm), shorter WB → QUICKER, AGILE
Rear Preload Low (more Rear Sag)
rear ↓ → chopper → ↑ rake (26.5°), ↑ trail (105mm), longer WB → STABLE, SLOW
Front Dive (braking)
front ↓ → ↓ rake/trail → TURNS IN EASIER mid-brake
Rear Squat (accel)
rear ↓ → ↑ rake/trail → STABLE EXIT
Key Rule: Adjust front + rear proportionally. Rear-only lowering = unstable front-heavy bike.
Practical Height Adjustment Guide
| Goal | Change | Example | Cost |
|---|---|---|---|
| Shorter rider | Lower rear 20-30mm | Bullet 350 | ₹8-12k shocks |
| Off-road | Raise rear 30-40mm | XPulse | ₹12-18k |
| Highway | Lower rear 15-25mm | Duke 390 | Fork spacers + shocks |
Safety: Max change is about 30-40mm. Test corners after making changes. Re-check sag (25-30%). The geometry section gives useful technical detail without being overwhelming.
How Softer Tyres Can Substitute For Plushness, Or How Stiffer Tyres Require Softer Settings In Motorcycles?
Tyre pressure and suspension work together as a system. Tyres are the first layer of suspension, soaking up small bumps before the shocks or forks move. Softer tyres make the ride feel smoother, while stiff tyres need softer suspension settings to balance things out.
Softer Tyres Equal To Free Plushness
Lower tyre pressure (within safe limits) increases sidewall flex, creating a bigger contact patch and more compliance:
- Small bumps ( less than 50mm): Tyre absorbs 50-70% of the impact, reducing what reaches suspension.
- Ride feel: Smoother, less “chattery” on patchy roads.
- Grip: Better on rough/wet surfaces (more rubber on road).
- Trade-offs:
1. Higher rolling resistance (2-5 kmpl drop)
2. Heat buildup, sidewall wear, and pinch flats risk
3. Stability drops at high speeds ( greater than 100 km/h)
Lower your tyre pressure by 4-6 PSI below the manual’s recommendation for city potholes (for example, Bullet 350: 28/32 instead of 32/36 for solo riding). This gives you a smoother ride without needing to change the preload.
Example: Honda Shine stock stiff shocks + 28 PSI tyres = noticeably smoother than 36 PSI over speed breakers.
Stiffer Tyres Demand Softer Suspension
Higher tyre pressure makes the tyres much harder, so every bump goes straight to the suspension:
- Ride feel: Harsh, jarring—suspension works overtime on imperfections it can’t handle.
- Suspension stress: Forks/shocks fatigue faster, and premature wear.
- Grip: Precise on smooth tarmac, but skips on rough. Poor wet traction (small contact patch).
Solution: Soften the suspension to make up for the harder tyres:
- Lower preload: More sag/compliance.
- Softer compression: Better small-bump absorption.
- Slower rebound: Prevents pogo effect.
Example: KTM 390 Duke track-tuned (high PSI + stiff damping) feels brutal on Mumbai roads. Drop to 30/34 PSI + 2 clicks softer compression = livable daily ride.
What Are The Common Misconceptions About Motorcycle Suspension Settings?
Many new riders get bad advice that leads to poor setups and frustration. Here are the most common myths, explained for Indian road conditions:
1. Stiffer Is Always Better
This is the biggest misconception. Riders think stiff suspension = better handling, but on Indian pothole-filled roads, stiff setups make tyres skip over bumps instead of maintaining grip. Stiff works great on smooth racetracks or perfect highways, but for city streets and village roads, a slightly softer setup keeps your tyres planted and you more comfortable. The KTM 390 Duke feels amazingly stiff-tuned on smooth ghats, but a Bullet 350 needs softer rear preload for daily potholes.
2. Factory Settings Are Perfect For Everyone
Manufacturers design for an “average” 60-70kg solo rider with no luggage. If you’re heavier, carry a pillion regularly, or haul groceries, those stock settings will feel wrong. A Royal Enfield Bullet 350 on step 1 feels plush solo, but bottoms out with pillion on step 1—you need step 4. Factory settings are a starting point, not the final answer.
3. Preload Makes The Suspension Stiffer/softer
Preload only changes how much the suspension sags under your weight—it doesn’t change the spring rate itself. Think of it like adjusting your backpack straps: tighter preload lifts the bike higher to match your load, but the spring inside stays the same strength. Use preload for load compensation; springs determine true stiffness. Wrong preload on a Hero XPulse (too high) makes it harsh; too low makes it wallow.
4. More Suspension Travel = Softer Ride
Long-travel bikes like the XPulse 200 4V (190mm front) can actually feel harsh if the springs and damping don’t match the travel. Riders expect “more travel = more plush,” but without proper sag setup (25-30% loaded sag), long-travel bikes either bottom out on big hits or skip over small bumps. Travel gives capability; setup determines comfort.
5. Suspension Upgrades Are Only For Premium Bikes
Entry-level commuters transform with basic upgrades. A Honda Shine or Hero Splendor with ₹5,000 YSS nitrogen shocks suddenly feels “premium” over potholes. Many riders think suspension upgrades are track-only, but basic commuters benefit the most from better shocks since their stock units wear out fastest.
6. Front Forks Don’t Need Maintenance
Dirty forks or old fork oil make 50% of ride harshness. Riders focus on rear shocks but ignore forks, which handle steering and braking forces. A ₹500 fork oil change on a Bajaj Pulsar 125 transforms the front-end feel—smoother turn-in, less chatter over bumps.
7. Just Inflate The Pillion’s Tyres More
Over-inflated tyres (rear at 50+ PSI) cause centre wear, a harsh ride, and poor wet grip. Proper PSI (36-42 rear with pillion) + correct shocks/preload = safe, comfortable two-up riding. Many riders think “more air = more support,” but it just transfers all road harshness to your backside.
Other Related Articles From Bikeleague India
- Motorcycle suspension – Complete guide to different types
- Bike chassis – Which is right for your riding style
- Indian Scout Bobber Twenty
- Suzuki Hayabusa
- Triumph Tiger 1200 Rally Pro
Faq About Different Suspension Settings In Motorcycles
1. What Is Motorcycle Suspension, And Why Is It Important?
Suspension is the system of springs and dampers that absorbs bumps, maintains tyre contact with the road, and influences how a motorcycle handles. Proper suspension setup makes riding safer and more comfortable and improves control in all conditions.
2. What Are The Common Types Of Front And Rear Suspensions Found On Indian Motorcycles?
Most Indian motorcycles use telescopic or USD (upside-down) forks at the front. The rear typically has either twin shocks (dual shock absorbers) or a single monoshock, depending on the model.
3. What Is Preload, And How Does It Affect My Ride?
Preload is the amount of compression in the suspension spring before the bike supports the rider’s weight. Increasing preload raises the bike and makes the suspension firmer, while decreasing it lowers the bike for a softer, more comfortable ride.
4. How Do I Adjust The Preload On My Motorcycle?
Preload is usually adjusted via stepped collars on twin shocks or threaded rings on a monoshock. Adjust to a higher step for more load (pillion or luggage) and a lower step for solo riding.
5. What Is Compression Damping In Motorcycles?
Compression damping controls how quickly the suspension compresses when hitting a bump or braking hard. More compression damping makes the suspension stiffer, while less allows for a softer, more compliant ride.
6. What Is Rebound Damping In Motorcycles?
Rebound damping determines how fast the suspension returns to its normal position after being compressed. Too little rebound feels bouncy, while too much makes the ride harsh and can reduce control.
7. How Can I Tell If My Suspension Is Too Soft Or Too Stiff?
Too soft: excessive dive under braking, frequent bottoming out, and a vague feel at speed. Too stiff: harsh ride over bumps, tyre skipping, and fatigue after riding.
8. Should I Use A Stiff Or A Soft Suspension Setting For Indian Roads?
Generally, softer settings suit rough Indian roads for comfort and grip, while stiffer setups are better for smooth highways and spirited riding. Adjust according to load, road, and riding style.
9. How Do I Set Up My Suspension For Riding With A Pillion Or Luggage?
Increase preload to prevent excessive sag and bottoming out. For bikes with adjustable damping, increase compression slightly for added load, but make changes gradually and test ride after each adjustment.
10. Is Adjusting Suspension Only For Racers And Advanced Riders?
No. Every rider can benefit from understanding and tuning suspension, regardless of experience. Even basic adjustments like preload can make a big difference in comfort, safety, and confidence.
Conclusion
Suspension tuning is not just for racers. It is a powerful but often overlooked tool for every Indian rider, whether you ride a Bullet 350, an Apache, a Duke, or an XPulse. Once you understand preload, compression, and rebound, and how they affect stiff or soft setups, you can get more comfort, control, and confidence from the bike you already have.
The right suspension setup can transform your riding experience, making every journey safer and more enjoyable. Try experimenting with your motorcycle’s settings, take notes on how each change feels, and adjust as your needs or road conditions change. With a little knowledge and care, you can make even a basic bike feel just right for you, without needing special tools or expert skills.
If you have any questions about motorcycle suspension tuning, feel free to email us at bikeleague2017@gmail.com or leave a comment below. We are always happy to help you.